Pumpkin & Rosemary Biscuits

When I say biscuit, its part that and partly scone. Bready and toothsome, deeply savoury and just about the perfect partner with a serving of Bangers & Colcannon or a hearty rooty soup to warm the cockles on a chilly day.

It's autumn, which means that I usually overdose on Pumpkin Spice Latte's. And I'm cool with that. I love those warming spices against comforting blanket of dairy goodness. But what I'm less cool about is why I have never tried to replicate the Pumpkin Spice flavour at home. This recipe remedies that!

Ever wondered if pea pods are any good for anything? Well, I asked friend, top chef and all round fab person Caitlin Ruth, and she said to blend them into a sauce. So I did...

Mr Flavour and I have uncovered the holy grail of bread making: No Knead Bread. 4 ingredients, less time and cost resulting in a light and seriously tasty loaf that won’t test your fortitude as a normal rational human being.

Not your everyday mix of ingredients, maybe, but trust me when I say that Pea and Anise are two flavours that are made to be together!

Yet more things to do with Broad Beans - essential when one's personal harvest has been (bean?) too successful! This is delish though, so do give it a whirl!

Sometimes, I remember a dish from childhood and wonder if I could make it better. This dish is one of those, and yes, I really did make it better. It's totally retro, and I'm totally cool with that...

In a departure from food, I decided there was another point of view about the ASAI banning THAT Tampax ad...

Necessity is the mother of invention, and having a garden full of different peas and beans means the creative streak is at peak these days! Broad Beans, or Fava Beans, are top of the menu at the moment. Serve them up with a nice Chianti, or some Feta - like in this simple salad!

This article was published in the July 2020 edition of The Opinion Magazine.

Hooray for Blackcurrant season! It is REALLY difficult to get blackcurrants in Ireland ... so imagine my delight when they appeared in a Fruit n Veg Box from Dunworley Cottage!

No matter what you think you know, there is always more to learn! This happened to me when a Greek friend responded to a photo of my Baby Broad Beans and said, I have a lovely recipe you can make with those...

Pumpkin & Rosemary Biscuits

When I say biscuit, its part that and partly scone. Bready and toothsome, deeply savoury and just about the perfect partner with a serving of Bangers & Colcannon or a hearty rooty soup to warm the cockles on a chilly day.

Mr Flavour swears he can taste bacon in these biscuits but I assure him there’s not, because there isn’t. Pumpkins and squash have magical properties: they are the chameleon of the food world, able to be sweet and savoury and can evoke buckets of umami. That’s what he was picking up as he scoffed into a freshly baked batch. I hope!

I recommend steaming the squash, rather than roasting and boiling, to reduce moisture intake (boiling) and moisture release (roasting). Steaming retains the pumpkins goodness, natural sweetness and shape. After steaming to perfection, I allow to just sit and air for about 10 minutes. It doesn’t matter if the squash gets cool because it’s going into the dough and then being baked anyway, but its an important step in getting rid of any excess moisture which can impact texture and rise. I like to roughly mash, mostly smooth but with some texture, to add a little bit of bite and interest to the finished scone.

The dough that you made will be quite sticky, so prepare to feel deeply uncomfortable when you’re handling the dough! Also, I can’t legislate for the type of pumpkin or squash you will use – there are so many varieties and each will have a different water content. So just be aware that if you are looking at your dough thinking: this can’t be right, it’s too wet, it probably is so just add a little more flour until such time as you have a dough that you can pick up and handle – but is still quite sticky too!

I use buttermilk for an extra hit of savouryness, but you can of course use normal milk.

Pumpkin & Rosemary Scones

Ingredients (makes 12 – 14 scones using a 6cm cutter)

  • 275g plain flour
  • 3 tsp baking powder
  • 1 tbsp caster sugar
  • 1/4 tsp salt
  • 1/2 tsp ground nutmeg
  • 1 tbsp fresh rosemary finely chopped
  • 60 g butter (chilled and cubed)
  • 125 ml buttermilk (+ a little extra to brush with)
  • 250 g pumpkin/squash, peeled, deseeded, cubed, steamed until tender and mashed/pureed
  • Toasted pumpkin seeds

Method

  • Pre heat the oven to 220 degrees Celsius, fan
  • Add the flour, baking powder, sugar, salt, nutmeg and rosemary into a bowl.
  • Add the cubes of chilled butter and crumble through to create a breadcrumb texture.
  • Add the buttermilk and mashed/pureed pumpkin and stir everything together to combine well and to create a sticky dough.
  • Flour the works surface and turn out the dough. Knead lightly into a smooth dough and form into a round about 2cm thick.
  • Cut out the dough using a 6cm cutter and place on a lined baking tray. Gather the remaining dough up, and reform to cut out more. Repeat until all the dough has been used up.
  • Brush each scones lightly with some buttermilk and scatter toasted pumpkin seeds on top.
  • Place in the oven and back for about 20-25 minutes until doubled in size, golden and cooked through.
  • Serve up with Bangers and Colcannon, or slather with the Pumpkin Spice and Maple Butter as a delicious mid-day snack.

Enjoy!

Pumpkin Spice & Maple Butter

It’s autumn, which means that I usually overdose on Pumpkin Spice Latte’s. And I’m cool with that. I love those warming spices against comforting blanket of dairy goodness. But what I’m less cool about is why I have never tried to replicate the Pumpkin Spice flavour at home. This recipe remedies that!

October through December is also when I love to indulge in toasted carbs. Pancakes, not crepes but American Style or Drop Scones as they are traditionally known in Ireland, are a firm favourite for breakfast, lunch and dinner. But also toasted Barmbrack – the traditional Irish fruit tea cake that gains popularity in the lead up to Hallowe’en, or Samhain, because of the trinkets stored inside said to bestow good or bad luck on whoever found them hidden amongst the cake. Toasted crumpets, drowning in butter; ditto toast in general and raisin and cinnamon bagels…

American Style Pancakes with Pumpkin Spice and Maple Syrup Butter

All of these things are vastly improved with butter. Vastly improved yet further if that butter is THIS butter: flavoured with the heady notes of Pumpkin Spice and the sweet succulence of maple syrup.

Of course, the irony of Pumpkin Spice is that it doesn’t contain pumpkins or even taste of them. I probably should have looked into the history of that more, but I don’t think it really matters because, ultimately, what’s important is flavour and comfort and this flavoured butter has both of those things in droves!

Pumpkin Spice and Maple Syrup Butter

Word to the wise: using unsalted butter and adding maple syrup to it does make this a soft butter that melts really quickly. I make sure it is well chilled before I use it, so the butter gets a fighting chance of sinking in to whatever you have lashed it on without just dribbling onto the plate and down your chin – although these are both perfectly acceptable too!

Ingredients (makes 1 x 15cm log of butter)

  • 100g unsalted butter, at room temperature
  • 1 tbsp maple syrup
  • 1 tsp ground cinnamon
  • 1/2 tsp ground ginger
  • 1/4 tsp ground clove
  • 1/8 tsp ground nutmeg

Method

  • Place all the ingredients into a food processor and blend until fully combined.
  • Empty out down the centre of a piece of parchment paper.
  • Wrap the parchment paper over the butter and start to twist the ends of the paper to force the soft butter into a log shape. Keep rolling and twisting until the butter feels compacted together into a tight butter log.
  • Place in the fridge and chill for at least four hours until very firm. If you can’t wait that long, pop it in the freezer for 30 minutes.
  • Slice into disks and serve on top of anything that is warm and deserves this delicious butter!

Enjoy!

Pea Pod Sauce & Bacon Bucatini

Ever wondered if pea pods are any good for anything? Well, I asked friend, top chef and all round fab person Caitlin Ruth, and she said to blend them into a sauce. So I did…

I can’t take full credit for this recipe because the original idea did come from Caitlin, but there’s no denying that pea and ham go together like Covid and 2020. I would humbly ask though that you visit her website and follow her on her Instagram page where she is just brimming over with ideas, top tips and dreamy food pics! Show her some lurve!

World Peas…groan…

So Cait gave me the tip on blitzing pea pods into a sauce, and I did the rest. It is quite a dairy heavy dish, but I’ll make no apologies for that because frankly a plate of pasta should feel luxurious in the mouth and taste bloody delicious!

I did tweak around with this a bit, (let’s face it, right now I have the fresh pea supplies to do that!), and I am really happy with the end result.

Just by the by, Caitlin also says that the version of her sauce, which you can find in her Instagram Highlights – look for the one where she is going through a veg box and handing out awesome suggestions like poker chips, is also good with fish and veggie pasta too.

Pea Pod Sauce & Bacon Bucatini

Ingredients

  • Peas and their pods: you’ll need a decent amount for this. Aim for around 250 – 350 g of peas in their pods.
  • Herbs: frankly peas go with most herbs, so whatever you have hanging around. I used chives, coriander and oregano. Tarragon and parsley would also work very well with chives.
  • Zest of a lemon, juice of half
  • Dash water
  • 150 ml fresh cream
  • Sea salt and black pepper
  • 130 g Gubbeen smoked bacon lardons (if you can’t find these, use a pack of streaky bacon or 3 excellent quality pork sausages, skinned and broken into pieces)
  • Parmesan – lots and grated
  • 25 g Gorgonzola
  • Enough long pasta for 2 people – I recommend Bucatini pasta for this dish.

Method

  • Pod the peas. Set them aside, then de-string the pods.
  • Place the pods in a blender/processor with herbs, lemon zest and juice and just a dash of water enough to get everything going. Blitz into a fine pulp.
  • Over a bowl, drain the pulp through a fine mesh sieve and use a wooden spoon to squeeze out all the liquid.
  • Clean out the blender, and add back in the liquid. To this, add cream, salt, pepper and a handful of the Parmesan cheese. Blitz to combine everything thoroughly. Pour out into a jug/bowl and set aside.
  • Place a pan of salted water onto to boil, and heat a saute pan over a medium heat. Add a little oil to the pan and add the lardons. Cook slowly until golden brown and crispy on the edges.
  • Using a slotted spoon, remove the bacon and place onto a sheet of kitchen towel. Leave the bacon fat in the pan.
  • Cook the pasta according to packet instructions. When the pasta is almost cooked but still a little al dente, add the peas and cook for 3 minutes or so, or until pasta and peas are both cooked.
  • Drain the pasta and peas, retain some of the pasta water.
  • Reheat the saute pan with the bacon fat over a medium heat. Add the pea pod sauce. Bring to the boil, add peas and pasta and toss to coat. Allow the sauce to thicken and coat the pasta. If it is too thick, add a little of the pasta water.
  • Right at the end, add little dabs of Gorgonzola and toss the pan.
  • Serve out onto hot plates, scatter with bacon lardons, a generous sprinkling of grated Parmesan cheese, glug over a little EVO and a final flourish with the pepper grinder. Bellissimo!

Serve with a crisp leaf salad, and some bread to soak up any left over sauce. I found this was delicious with something very un-Italian, Stonewell Cider, red label.

Enjoy…

No Knead Bread

Mr Flavour and I have uncovered the holy grail of bread making: No Knead Bread. 4 ingredients, less time and cost resulting in a light and seriously tasty loaf that won’t test your fortitude as a normal rational human being.

This article appeared in the May 2020 edition of The Opinion Magazine. It also included mine and Mr Flavour’s tried and tested recipes for Irish Soda Bread and Banana Bread.

A few short years ago, my husband and I jumped on the Sourdough bandwagon. It was a journey of epic proportions: epic costs of classes (although they were immense fun), epic time spent keeping The Starter alive, books, equipment and enough flour to almost justify investing in my own mill.

When I think back to how much flour we threw away between feeding the starter and lovingly kneaded loaves of bread that turned out flat and uninspiring; or the three occasions we killed the flipping starter stone cold dead and had to start again, I feel glad we abandoned “the journey” long before Covid-19 came along and made the whole idea of wasting so much time, patience, money and flour inconceivable!

However, my Instagram feed is still full of bready creations from people restarting their sourdough adventures or trying it out for the first time, and while many are still embroiled in the saga that is making bread with a sourdough starter, my husband and I uncovered the holy grail of bread making: No Knead Bread – four ingredients, less time and cost resulting in a light and seriously tasty loaf that won’t test your fortitude as a normal rational human being.

No Knead Bread

So easy in fact, that No Knead Bread is a perfect project for the at-home baker desperately seeking new distractions, and parents panicking for something else to do with their little angels before the very last nerve has been completely and utterly frayed.

No Knead Bread

This mixture will make a medium loaf. Double the quantities for a larger loaf.

Ingredients

  • 350 g strong bread flour
  • 1 ½ cups tepid water
  • 7 g packet of dried yeast or 1 1/2 tsp of fresh yeast
  • 7 g of salt

Method

  • Mix water, salt and yeast in a mixing bowl, then add flour. Mix with a spoon until combined.
  • Loosely cover and leave for a minimum of two hours.
  • Tip out the dough onto a floured surface and fold the four ‘edges’ into the middle.
  • Clean the mixing bowl, dry thoroughly and dust with some more flour. Put the bread mixture back in the bowl, cover and leave for a minimum 30 minutes or up to 2 hours for the second prove – the longer the better.
  • Heat the oven to 220 degrees Celsius, fan, and place a deep casserole dish with a lid into the oven to heat.
  • Tip the bread mixture out onto a lightly floured surface. The mixture will feel wetter and stickier than you might expect, but this is good because a dough with higher moisture will give more rise and bubbles in the finished loaf.
  • Just bring the dough together enough that you can pick it up and place it into the searing hot casserole dish, cover with the lid and cook for 15 minutes and a further 20 minutes with the lid off to allow the bread to finish rising, crisp and colour.
  • Tip the bread out of the dish and tap the bottom, if it sounds hollow it’s done.
  • Allow to cool for 30 minutes before cutting.

Pea, Prawn, Pistachio & Tarragon Risotto

Not your everyday mix of ingredients, maybe, but trust me when I say that Pea and Anise are two flavours that are made to be together!

I first came across the flavour pairing of prawn and pistachio many years back when I was running the Supper Club from Scannell’s Pub in Clonakilty. I was working with a young and gifted head chef, Izaak Bradley, and he told me to trust him that these flavours would blow my mind. And they did! Ever since I have been promising myself to attempt a dish with those flavours.

So in part this dish is inspired by that dish, but it is also a dish that comes out of necessity. You see, along with pretty much everything else in my garden this year, the peas are very, very abundant; as is French Tarragon – a herb I absolutely adored as a kid and usually linked to a Sunday roast chicken – the only dish Mum used tarragon in.

But what goes together with peas but tarragon! It’s sweet, grassy, aniseed notes are a match made in heaven. It also goes well with prawns. And so the four flavour pillars of this risotto meet together! To further enhance the flavour relationship, I swapped out white wine typically used in risottos for Vermouth.

As ever, a risotto is a risotto is a risotto – there really is only one way to cook one; but the potential for different flavours combinations is huge! You’ll find quite a few risotto recipes on The Flavour Files, and many of them are best suited to cooler, darker days when all that will suffice is a big hug in a bowl. But this one is lighter and brighter, perfectly suited to late summer when peas are at their plumpest and sweetest.

Pea, Prawn, Pistachio & Tarragon Risotto

Ingredients (serves 2)

  • 1 tbsp light olive oil
  • 3 shallots, finely diced
  • 1 large / 2 small cloves of garlic, peeled and finely chopped
  • 225 g (or 1 cup) or risotto rice
  • 150 ml white vermouth
  • 850 ml good quality hot stock (vegetable or chicken)
  • 250 g fresh / frozen peas
  • 250 g prawns (rinsed and dried)
  • 1 tbsp fresh tarragon, finely chopped (or 1 tsp of dried)
  • 50 g pistachio nuts, shelled and roughly chopped
  • Parmesan cheese
  • Salt, pepper and EVO

Method

  • I like to use a deep saute pan when I cook risotto, but if you don’t have one a large frying pan would do too.
  • Heat the pan over a low-medium heat. Add the oil and the shallots and saute gently with the lid on until translucent. Add the garlic, stir.
  • Add the risotto rice and stir so it soaks up all the onion and garlic juices. Turn up the heat to medium, and cook for another 3 minutes.
  • Add the vermouth, stir until the liquid has been soaked up.
  • Start to add the stock, a ladle-full at a time. Stir the risotto constantly, only adding more stock as the previous stock has been soaked up by the rice. This will happen quickly at first, but slow down the more stock is added.
  • Once about half the stock has been incorporated, add the peas. Continue to add stock and stir.
  • Taste the rice, when it is almost cooked through add the fresh prawns. Keep stirring.
  • At this point you may have left over stock or you may need to add a little more. The rice should not be chalky, but not be too soft; and the risotto itself should be able to hold shape but not be too thick and stodgy or too watery. I find that risotto texture depends on the person – I prefer mind to retain a little body when served rather than a soupy mess, but it is up to yourself!
  • Grate a decent amount of parmesan – don’t be shy about it! Add a handful or so to the risotto and stir through to melt into the rice.
  • Add the fresh tarragon. Check for seasoning, add a little more salt if needs me and a couple grinds of black peppercorns.
  • Serve up on warmed plates. Scatter about with chopped pistachios and more of the grated parmesan. Finish everything off with a little drizzle of excellent quality Extra Virgin Olive Oil.

Serve this risotto up with a simple leaf salad, and a glass of crisp, cool, summery rose wine.

Deeply Dippy Broad Bean Dip

Yet more things to do with Broad Beans – essential when one’s personal harvest has been (bean?) too successful! This is delish though, so do give it a whirl!

Is it a dip? Is it a hummus? Is it a pesto? I’m not sure to be honest, but what I do know is that it can any of the above, but most importantly what it definitely is is DELICIOUS!

It is also really simple. So, if like me you are staring down the barrel of another three to four weeks of non-stop bean eating, this little whizzo of a dish will make a refreshing change in how to eat your beautiful sweet Broad, (Fava), Beans!

I created this the same night I tested out the Retro Tuna Plait recipe, and the two things together were just amazing!

Deeply Dippy Broad Bean Dip

Ingredients (makes about 200 ml of dippy/hummusy/pestoy/saucy thing)

  • 2 generous handfuls of Broad Beans in their pods
  • 2 tbsp pine nuts
  • 1 clove garlic, peeled and roughly chopped
  • Juice of half a lemon
  • 1 tbsp Extra Virgin Olive Oil
  • 1 1/2 tbsp Natural Yogurt
  • 1 tsp sweet smoked paprika
  • Sea salt to taste

Method

  • Pod, skin and blanch the Broad Beans.
  • Place all the ingredients into a blender/processor, and blend until smooth.
  • If a little too rough, add more yogurt a little at a time until the mix blends into an almost smooth consistency. I like a little texture to my hummus, but some prefer their totally smooth, so blend according to your preference.
  • Place in a bowl, drizzle a little more EVO over the top. I decorated mine with a vibrant orange nasturtium flower (edible), but herb flowers, calendula petals or some other edible flower would make a lovely garnish against the fresh green colour of the dish.

Although I used this like a vegetable condiment to my Retro Tuna Plait, this goes really well as a topping for toasted sourdough crostini; a dip for crudities, or even swished through long pasta with heaps of grated parmesan and black pepper.

Retro Tuna Plait

Sometimes, I remember a dish from childhood and wonder if I could make it better. This dish is one of those, and yes, I really did make it better. It’s totally retro, and I’m totally cool with that…

Mum was the queen of the diet pamphlet, and her favourite was for a “High Fibre Diet” – roughly photocopied onto a mint green coloured paper and stapled together like some sort of make-do-and-mend craft project. Most the recipes passed me by, I don’t remember them at all – memorably unmemorable, you could say. But there was one recipe that really shouldn’t have worked, but it did, and it is the only recipe I remember from that pamphlet.

The basic flavour profile here is thus: tuna, peppers, scallions and pastry. It doesn’t sound the best does it? But trust me, it’s actually tasty AF! I don’t quite know where the ‘High Fibre’ element comes into this dish, but then again, this isn’t what I, personally, am looking for. Serve it up with an aul slice of brown bread if you really must – no-one’s judging you!

I had all but forgotten about this dish too, and then, one day, for no discernable reason, I remembered it as clear as a bell, and ever since I’ve been procrastinating about trying it out. I had a sneaking suspicion I could make it taste even better, and an even sneakier one that this would probably be a really simple mid-week supper that tasted like you spent far longer working on it than it does.

Think of it like a giant tuna sausage roll. The trickiest thing about it is the braiding, but when have I ever asked you to tie yourself in knots about how something looks? Remind yourself what the name of this blog is, then get over yourself and crack on!

Another absolutely great thing about this is that there is no cooking involved – except to bake the thing in the oven. If you can get your hands on some quality roasted red peppers in olive oil, this even saves you the job of blistering a long sweet red pepper on the gas ring of your hob. I insist you use ready made puff pastry for this recipe – another shortcut!

All this aside, the quality of the main ingredient is key. Back in the day, Mum used cheap tinned tuna – and of course if this is what is in your budget, then go for it. But in Ireland we are lucky to have the Shine Family who create a beautiful ready to eat product with their Wild Irish Tuna range. Chunky loins of silky tuna, preserved in olive oil and presented in glass jars, it is a far superior product to the tinned, super flaky, budget tinned variety. Early this year, the Irish Food Writers Guild bestowed its product award to the Shine family – so it comes highly rated by those in the know!

To give the dish some extra pep, I used Shine’s Wild Irish Tuna in Chilli Oil. It was the perfect choice! I served it up with a garden leaf salad, and it works really well with a Broad Bean Hummus I made (get the recipe here!)

Retro Tuna Plait with Broad Bean Hummus

Ingredients (serves two as a dinner, or four for a light lunch):

  • 2 x jars of Shine’s Wild Irish Tuna in Chilli Oil
  • 1 sheet of ready made puff pastry
  • 2 long sweet red peppers / ready roasted peppers in olive oil
  • 3 scallions, trimmed and finely sliced on the round
  • 1 clove of garlic, peeled and grated
  • Zest of a lemon, juice of half
  • Sea salt and black pepper
  • 1 egg yolk, mixed
  • 1 tsp Nigella seeds

Method

  • Pre-heat your oven to 200 degrees Celsius.
  • If you are blistering your own peppers, do this now. When fully blistered, place into a plastic bag and allow to sweat for 2 -3 minutes. Remove from the bag, and using the flat side of a pairing knife blade, scrape off the scorched skin, remove the pepper stem, cut open and remove the pith and seeds. Cut the pepper halves in half again, then slice into small rectangles. Add to a mixing bowl.
  • Remove the tuna loins from the chilli oil. Break down a little into smaller pieces and add to the pepper.
  • Slice the scallions and add to the tuna and pepper along with the lemon zest, lemon juice, sea salt, a generous few grinds of the pepper mill, and a little of the chilli oil from the jar.
  • Very gently, so as not to break down the tuna too much, mix everything together. Set aside.
  • Roll out your sheet of puff pastry. Cut into two equal pieces along the short side to create two just-about-square pieces.
  • Into the middle of each place an equal amount of the tuna filling. Pile it high rather than wide to give the plait some height…exciting!
  • Using a non-serrated knife, to the left and right of the filling, cut a diagonal line from the bottom to the top. Don’t stress too much if the lines either side don’t line up perfectly!
  • You should be left with a odd shaped piece of pastry at the top and bottom of the filling. Fold these onto the filling first, then working from the bottom, pull across the pastry ribbon from the left and over onto the top of the filling, followed by the right pastry ribbon, all the way to the top.
  • Brush the pastry all over with the egg wash, the scatter all over with the Nigella seeds.
  • Place in the oven and bake until the pastry is cooked, puffed up and golden brown.

A light pale ale goes really well with this. Enjoy…

We need to talk more about menstruation…period

In a departure from food, I decided there was another point of view about the ASAI banning THAT Tampax ad…

This article was published in The Echo – read it online here.

Have you heard of Michelle Wolf? She’s a US comedian who has a skit about periods that is probably one of the best I’ve ever heard. Michelle says things like: “if men had periods, we would have a three-week work month,” and that “if Paul came into the office with his arm ripped off, bleeding; everyone would be like ‘how are the expense reports coming along Paul?’ and he would say ‘great, and by the way – I’m fine, I don’t want to murder you.’”

Michelle also says that, when it comes to period ‘technology’, us women haven’t done enough to improve our lot – that we are satisfied that our best solution is a “rolled up piece of cotton.”

This is relevant because of THAT banned Tampax ad. There has been a lot of vitriol directed at the 84 who complained; complained because their children asked awkward questions after watching it, or those who found the demonstration too sexualised.

Ciara Kelly of Newstalk got very angry and said that while Ireland is ready to vote for same-sex marriage and abortion rights, it isn’t ready to stop shaming women’s bodies. Roisin Ingle, writing for the Irish Times – whilst menstruating, that she was mad as hell; that women go around in an almost permanent state of being “stained and shamed” for most of their adult lives as we try to hide the fact that we are on our periods.

I’ll admit that I am not a fan of that Tampax advert, but not in the same way as Ciara and Roisin; and not in the same way as the 84 complainants didn’t like it either. My uneasiness comes from the fact that the ad was just not well made. It could have been so much better.

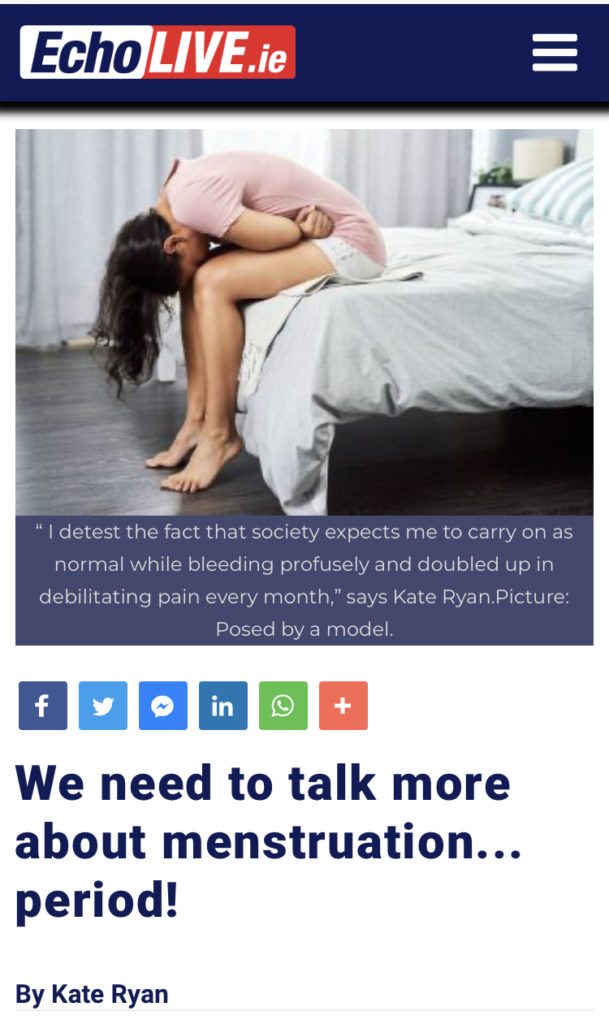
Like Michelle’s period skit, I detest the fact that society expects me to carry on as normal while bleeding profusely and doubled up in debilitating pain every month. I had my first period at 11, in the summer holiday just before starting secondary school. From a very young age, my Mum made sure my sister and I were well informed about how our bodies would change as we got older, what a period was, why we had them and the whole sex education bit too.

Mum wanted us to be informed but, more importantly, prepared.

For another 13 years after that, I struggled with horrific period symptoms until aged 24, I was diagnosed with Polycystic Ovarian Syndrome, (PCOS), and then immediately told nothing could be done and to get on with it. All of which has meant that, since the age of 11, I have been looking forward to menopause with an unusual amount of eagerness. At aged 42 now, surely, the promised land is near. I hope so. I am so sick of periods.

Painful, messy, life-interrupting periods like mine are more the norm than not. All we want to do, says Michelle, is lie down on the floor and fart. To that I’ll also add: sleep, cry, nearly overdose on painkillers, wear pyjamas all day long and lay on the sofa watching crap TV eating chocolate and popcorn. So, the first thing that really irks me about that Tampax ad is how unrealistic the actors are in it.

Body conscious dresses, immaculate hair and make-up: this isn’t how most of us look most of the time, let alone mid-period. There is an American version of the Tampax-Ad-as-Education with comic Amy Schumer, vox-popping average American’s of all ages, creeds and sexes in an average American shopping Mall, and you know, they actually look like real people, and I find that comforting. Also, Schumer’s ability to be charming yet cutting works to break down the awkwardness barrier, unlike the unspeaking, docile and embarrassed “guest” character in the UK version.

Secondly, why oh why are we relying on TV to educate us on the correct way to wear our menstrual aid? I’m starting to think that maybe I was fortunate to have an over-sharing mother! But there’s no denying she felt this was absolutely, without doubt, part of her parenting responsibility: we were encouraged to be open about our experiences and to question everything.

But at the same time, I also remember in my group of friends talking about what was happening to us; asking questions and supporting each other as, one by one, we experienced our first periods, or Menarche.

Lastly, and much later, schools waded in with their sex education, bringing in trained experts in health and wellbeing who could better explain and answer questions. I remember one lad asking why periods are called periods, adding if it was because they last for 30 minutes? We giggled of course, but we don’t know what we don’t know and when it comes to our bodies, information is very much power.

Of course, sadly enough, in 2020 it is considered a great leap forward to talk openly about periods on TV – and it is great. But it should not relinquish the responsibility parents have to their children, friends have to each other and educators and health professionals to get in there first with information and support rather than allowing an information vacuum to develop where media is left to educate us – especially when it’s a corporate behemoth looking to flog more product.

Thirdly, the line, supposedly full of encouragement for our own bravery to “get them up there, girls!” Oh, where to start. Maybe the reductive use of “girls” for all female women? Maybe it’s the forcefulness of the encouragement to shove things up where the sun literally doesn’t shine. There just must be a better way of ensuring tampons are used correctly and comfortably. Talented copywriters of the world unite to come up with something better than this, please!

Lastly, it’s inevitable to question why, with all the science and innovation we have at our disposal, our best options are either an oversized novelty cotton bud to shove up our vagina or a pad so thick that it can make us waddle when we walk? That the best technological improvements in capturing our bloody menses are to make pads and tampons smaller, thinner, more discreet isn’t an improvement – it’s just a way of limiting our awkwardness and very much so speaks to Ciara Kelly’s point about female body shaming.

There is of course the Mooncup, a device that sits inside the vagina and collects the menstrual blood which happily can be retrieved, emptied, washed out and reinserted every few hours. That sounds like fun.

Just to be clear, it is ridiculous that the ad was banned in Ireland. The ASAI should have a radical rethink because right now it looks ridiculously out of step with the general Irish zeitgeist. The ads must do better, but, more importantly, we must all do better: to talk about our experiences, support each other and share what we know with each other. To crack jokes about having to go out with spare knickers and trousers in our handbag during a period in case of “leakage” and not feel so damn embarrassed about it.

Periods are horrible, messy, infuriating, but they are also natural, necessary, and part of what makes us who we are. It’s what leads to us all being here in the first place, after all.

Fava & Feta Salad

Necessity is the mother of invention, and having a garden full of different peas and beans means the creative streak is at peak these days! Broad Beans, or Fava Beans, are top of the menu at the moment. Serve them up with a nice Chianti, or some Feta – like in this simple salad!

I grew up eating Broad Beans – and hated them. But that was because we never did the double-podding – we were all about maximum fibre in our house, so the pods came off but the skins stayed on. Being an adult has at least some advantages, in that now I am prepared to sacrifice a small amount of additional food prep time to pod and skin my broad beans and the rewards are worth it.

Sweet, nutty, grassy Broad, or Fava Beans, especially when they are medium sized in their pods, are just wonderful eaten raw. But if this doesn’t sit right with you, (or if you are someone partial to a bit of gustatory fluctuation when it comes to beans), a quick blanch for a mere minute should help you get around this!

So aside from the time taken to double-pod your beans, the rest of this salad will be ready in about five minutes. I served it up with some Ras al Hanout spiced and BBQ’s chicken thighs with some potatoes and leaves from the garden too, but this also works well as a topping for sourdough crostini.

Fava & Feta Salad

Ingredients (serves 2, scales up easily):

  • 2 or 3 large handfuls of Broad Beans in their pods
  • 125 g Feta cheese
  • 25 g pine nuts, toasted (you could also use flaked almonds)
  • 1 spring onion, trimmed and finely sliced on the round
  • 1 tsp sumac
  • Extra Virgin Olive Oil
  • Sea Salt, Black Pepper
  • 1 tsp of lemon zest and juice from 1/4 of a lemon
  • Handful of herbs, roughly chopped: oregano and chive work well.

Method:

  • Remove the beans from their pods, remove the skin. If the beans are small to medium sized and sweet, they can be eaten raw. Any bigger and I would recommend blanching for about a minute before refreshing in iced water. If the thought of eating raw beans isn’t for you, whatever the size of the bean, then do this too!
  • Drain the beans, place into a bowl.
  • Crumble over the feta cheese, add the spring onion.
  • Toast the pine nuts (or flaked almonds) in a dry pan. Set aside to cool slightly.
  • Sprinkle the Sumac over the beans and feta. Add a small pinch of sea salt (the feta will already be salty), and a grind of black peppercorns.
  • Add the lemon zest and juice and a generous glug of EVO (about 1 tablespoon). Chuck in the herbs.
  • Mix all together and serve.

Enjoy…with a nice glass of Chianti, maybe. Fuhfuhfuhfuhfuhfuh…!

Get Creative with your BBQ this Summer

This article was published in the July 2020 edition of The Opinion Magazine.

I just adore cooking and eating outside. The incredibly good weather of late has meant, here at Flavour HQ, that we are doing both a lot more and improving our low and slow cooking game, experimenting with different heat, charcoal and smoke too.

There are two things you need to know about Barbecuing. Firstly, you really don’t need to spend a lot of money on a BBQ to get good results. If you want to put your money somewhere, invest in good quality charcoal that will give you a long, slow burn time opening up options for both fast and slow cooking. Secondly, pick good ingredients and think outside the box when it comes to what to cook. You can cook burgers and sausages any day of the week inside over electric or gas, but if you’re going to the time and trouble to build a good stack of embers then think differently about what to cook too.

Here are some of my favourite things to Barbecue – hope this inspires you to try something different too!

Try Different Meats

Ballinwillin House in Mitchelstown raises free range, organic venison, wild boar and goat; Skeaghnore offer duck winglets which are great cooked low and slow, and from Twomey’s Butchers there is rich Buffalo meat. These meats are a great alternative to beef, pork, lamb and chicken. Burgers made from wild boar and buffalo are incredible in both flavour and texture, or marinade chunks of goat meat and make the best Souvlaki skewers with buffalo halloumi ever tasted!

Try Different Cuts

Caherbeg/Rosscarbery Recipes are offering the most incredible Cote de Boeuf directly from them or for collection via your nearest Neighbourfood. Cote de Boeuf is a prime rib steak on the bone from grass-fed cows; the fat marbling and bone all lend extra wonderful flavour during cooking. Cook over indirect hot embers, and, if you have some, a sweet smoke wood block or hickory chippings, until medium rare. One Cote de Boeuf will feed between 4-6 people depending on what else is served with it.

Caherbeg Cote du Boeuf

Fresh Chorizo

Swap traditional sausages for something with infinitely more bang! Fresh chorizo, (important not to use the dried cured chorizo), cooked on the BBQ is heaven. Cook in the same way you would traditional sausages, but instead over indirect heat (this means pushing white hot coals to one side of the BBQ and food items the opposite side allowing for slower, gentler cooking). The high fat content of fresh chorizo will start to render down, caramelising the outside and intensifying the sweet, spicy, smoky flavours of the chorizo. Incredible!

Smoked Garlic and Onions – cooked direct on the coals

Fish and Shellfish

Fresh fish cooked on the BBQ is heaven! Skewer fresh shell-on langoustines to prevent them from curling up and cook quickly over a high heat until slightly charred and sweet. Get a fish cage and place inside a gutted whole fish, (e.g. sea bream or red snapper); brush the skin with a little oil, salt and pepper, fill the cavity with slices of lemon, parsley and dill. If you have a Dutch Oven, fill with fresh, cleaned mussels; add butter, white wine, garlic, lemon and herbs and cook directly on the coals, lid on, until the shells open. Serve in the Dutch Oven with chunks of crusty bread.

Vegetables

Vegetables become magical cooked over the coals. These are my favourites!

Sweet Corn: This time of year, you will see fresh sweetcorn for sale still in its husks. Simply place the whole thing on the BBQ over indirect heat for about an hour. When cooked, pull back the husk and cook for another five minutes. Served lashed with melted butter, salt, pepper and a squeeze of lime.

Pork Ribs & Charred Sweet Corn

Aubergine: Over a high heat, even while still flaming, cook aubergines turning every couple of minutes until the skin in completely burnished. This might take 10 minutes or more depending on size of the aubergine. Take off the heat, cut open and scoop out the tender, pulpy flesh into a bowl. Add garlic, tahini paste, extra virgin olive oil, salt, lemon zest and juice and mash together to make a paste. Add pepper and finely chopped parsley, check for seasoning. Serve drizzled with more olive oil and garnish with pomegranate seeds if you have them. This is Baba Ganoush and it is so much better than hummus!

Charred Broccoli with Pomegranate Molasses and Spiced Almonds

Sweet Potatoes: Two ways I like best. Leave whole, prick all over and rub the skins with olive oil. Place on low indirect heat and cook for an hour or until they are soft to the touch. Slice in half and season with sea salt and pepper. Alternatively, cut into 5cm chunks and place on a piece of foil, season with olive oil, whole garlic cloves, rosemary, salt and pepper. Tie up into a parcel and place next to the coals to cook for about 25-30 minutes. You can also do this with regular white potatoes.

Sweet Potato with Oregano and Garlic

Dessert

Two of my favourite fruits to cook on a BBQ are peaches and pineapples.

Peaches: Slice in half and remove stone. If not serving this to kids, brush with a little bourbon on the cut side. Place face down on the BBQ for 5 minutes, turn and repeat. They are done when the fruits are soft but still hold their shape. Serve with vanilla ice cream and a drizzle of Nolwen’s Street Food salted caramel sauce.

Pineapple: Peel and core the pineapple then cut lengthways into 6-8 pieces. Place on the BBQ and turn every minute or so until they begin to caramelise all over. Serve with a simple sugar syrup flavoured with dark rum, fresh finely chopped chilli and mint and lime zest; and ice cream.

Blackcurrant & Lemon Verbena Ripple Mousse

Hooray for Blackcurrant season! It is REALLY difficult to get blackcurrants in Ireland … so imagine my delight when they appeared in a Fruit n Veg Box from Dunworley Cottage!

Growing up, we had, what seemed to me, hundreds of Blackcurrant bushes in our fruit garden. I know because it was down to me to go out and pick the feckers all summer long! But there’s nothing quite like the scent that wafts from the leaves of the blackcurrant plant, and the sweet but tart bite of the pearlescent black and purple fruits.

I also have some Lemon Verbena growing in the garden – one of those old fashioned herbs that became the darling of chefs a few years back. Its wonderfully aromatic, and to eat it reminds me of Lemon Sherbet – like lemony popping candy – a pure delight! But what to do with it?

I decided to make a compote of the Blackcurrant scented with Lemon Verbena, and then I decided that the zingy lightness of the Lemon Verbena leant itself to a delightfully fluffy, and light as a feather, Summer Mousse. This is the recipe, and be quick: Blackcurrant season isn’t long, despite my childhood memories, and this year seems to be an exceptionally good year for them – so indulge as much as you can!

Blackcurrant & Lemon Verbena Ripple Mousse

Ingredients:

For the Compote

  • 200 ml water
  • 150 g white sugar
  • 350 g blackcurrant
  • 4 sprigs of lemon verbena (substitute for lemon zest)

For the Mousse

  • 250 g double cream
  • 3 medium egg whites

Method:

  • Into a heavy-bottomed saucepan over a medium-low heat, add water, sugar and lemon verbena sprigs, stir until the sugar is dissolved.
  • Add the blackcurrants and cook for 8 minutes. Remove from heat and carefully remove the sprigs of lemon verbena with tongs (it’ll be very hot!)
  • Allow the compote to cool fully before making the mousse mix.
  • When the compote is cooled, in one bowl whip the cream and in the other whisk the egg whites to a stiff peak.
  • Take one spoonful of the egg white and fold into the cream gently. Repeat until all the egg white has been folded into the cream. Do this all as gently as possible so as not to loose any of the air out of the mix.
  • Swirl two generous tablespoons of the compote into the mousse mix and very gently stir through so the compote ripples through the mousse.
  • Into a serving glass, place an amount of compote in the bottom, followed by some of the mousse mixture and top with another spoon of the compote. Garnish with a sprig of fresh lemon verbena, take up your spoon and dig in with glee.

Enjoy…

Organic Fruit & Veg Boxes available from Dunworley Cottage: https://dunworley.com/fruit-veg-boxes/

Baby Broad Bean Stew

No matter what you think you know, there is always more to learn! This happened to me when a Greek friend responded to a photo of my Baby Broad Beans and said, I have a lovely recipe you can make with those…

The recipe that followed was more a list of ingredients – a list I might add that seemed incredibly short and looking temptingly easy to make. Further to my #GIY adventures this year, everything I plant has not only sprouted, but taken on an almost Triffid-like quality leaving me petrified for the forthcoming Pea and Bean Armageddon I see looming in my near future!

For that reason, my friend, Nana Karaoulani’s suggestion that I make a traditional Greek dish, heretofore unheard of by me, as a way of making a genius inroad in my Broad Bean Crop, was well-timed and brilliant!

Baby Broad Beans growing happily in my garden…

I do seem to be on a bit of Greek flow at the moment with my food and flavours! It must be the time of year. It’s also one of my favourite cuisines, and there is a strong familial link with this cuisine too. I didn’t hesitate in heading out to my garden and picking off a colander of smaller pods and getting to work in the kitchen.

There is one tiny time consuming activity associated with this dish (aside from growing your own veg, of course!), and that is de-stringing the beans! Usually, when I eat Broad Beans, the labour comes from double-podding: taking the beans out of their furry jackets and removing the outer skin to reveal the tender, bright green flesh within. Now, if you had my childhood, every Broad Bean ever put in front of me was subjected to single podding only. My mother, obsessed with dietary fibre, made us eat the rubber outer skin. She is right of course, but when one becomes an adult, we can do things our way, and I say Double-Podding is worth every moment.

Anyway, with baby Broad Beans (or Fava Beans as you might know them to be), what is required is to top and tail and run a pairing knife down the side seam of each bean to remove the string, keeping the pod intact. Put each bean into a bowl of lemon water to prevent oxidisation and turning the pods black where you cut them. We cook the whole thing, double-pods and all, and let me tell you: this dish is delicious! Thank you Nana for the top tip!

Baby Broad Bean Stew

Ingredients:

  • 1 tbsp Olive oil
  • 1 large onion, finely diced
  • 500 g baby broad beans
  • 400 g tin chopped tomato
  • 300 ml water
  • 3 potatoes, scrubbed/peeled and cut into apx 3 cm pieces
  • Salt and Pepper
  • Handful of Feta cheese, crumbled

Method:

  • Heat a saute pan over a low heat, add oil and onions. Cook the onions until softened and brown. Add the baby broad beans and potatoes, tin of tomatoes and top with the water so that all has been covered.
  • Cook until all is tender and most of the liquid has cooked off. You are looking for a thick sauce-like texture. Season with salt and pepper.
  • Tip out into a serving bowl and top with crumbled feta.

I served this dish with a joint of slow cooked lamb and a side of braised fennel topped with crispy, garlicky breadcrumbs. Delicious, and so simple – a feast for the whole family!

Enjoy…

web design and development by the designer of things