
In 2022, an innovative programme appeared on my radar seeking a new, positive way forward to the chef crisis.
Continue reading “Meet the first graduates of West Cork Chef Academy”Braised Carrots and Lentils
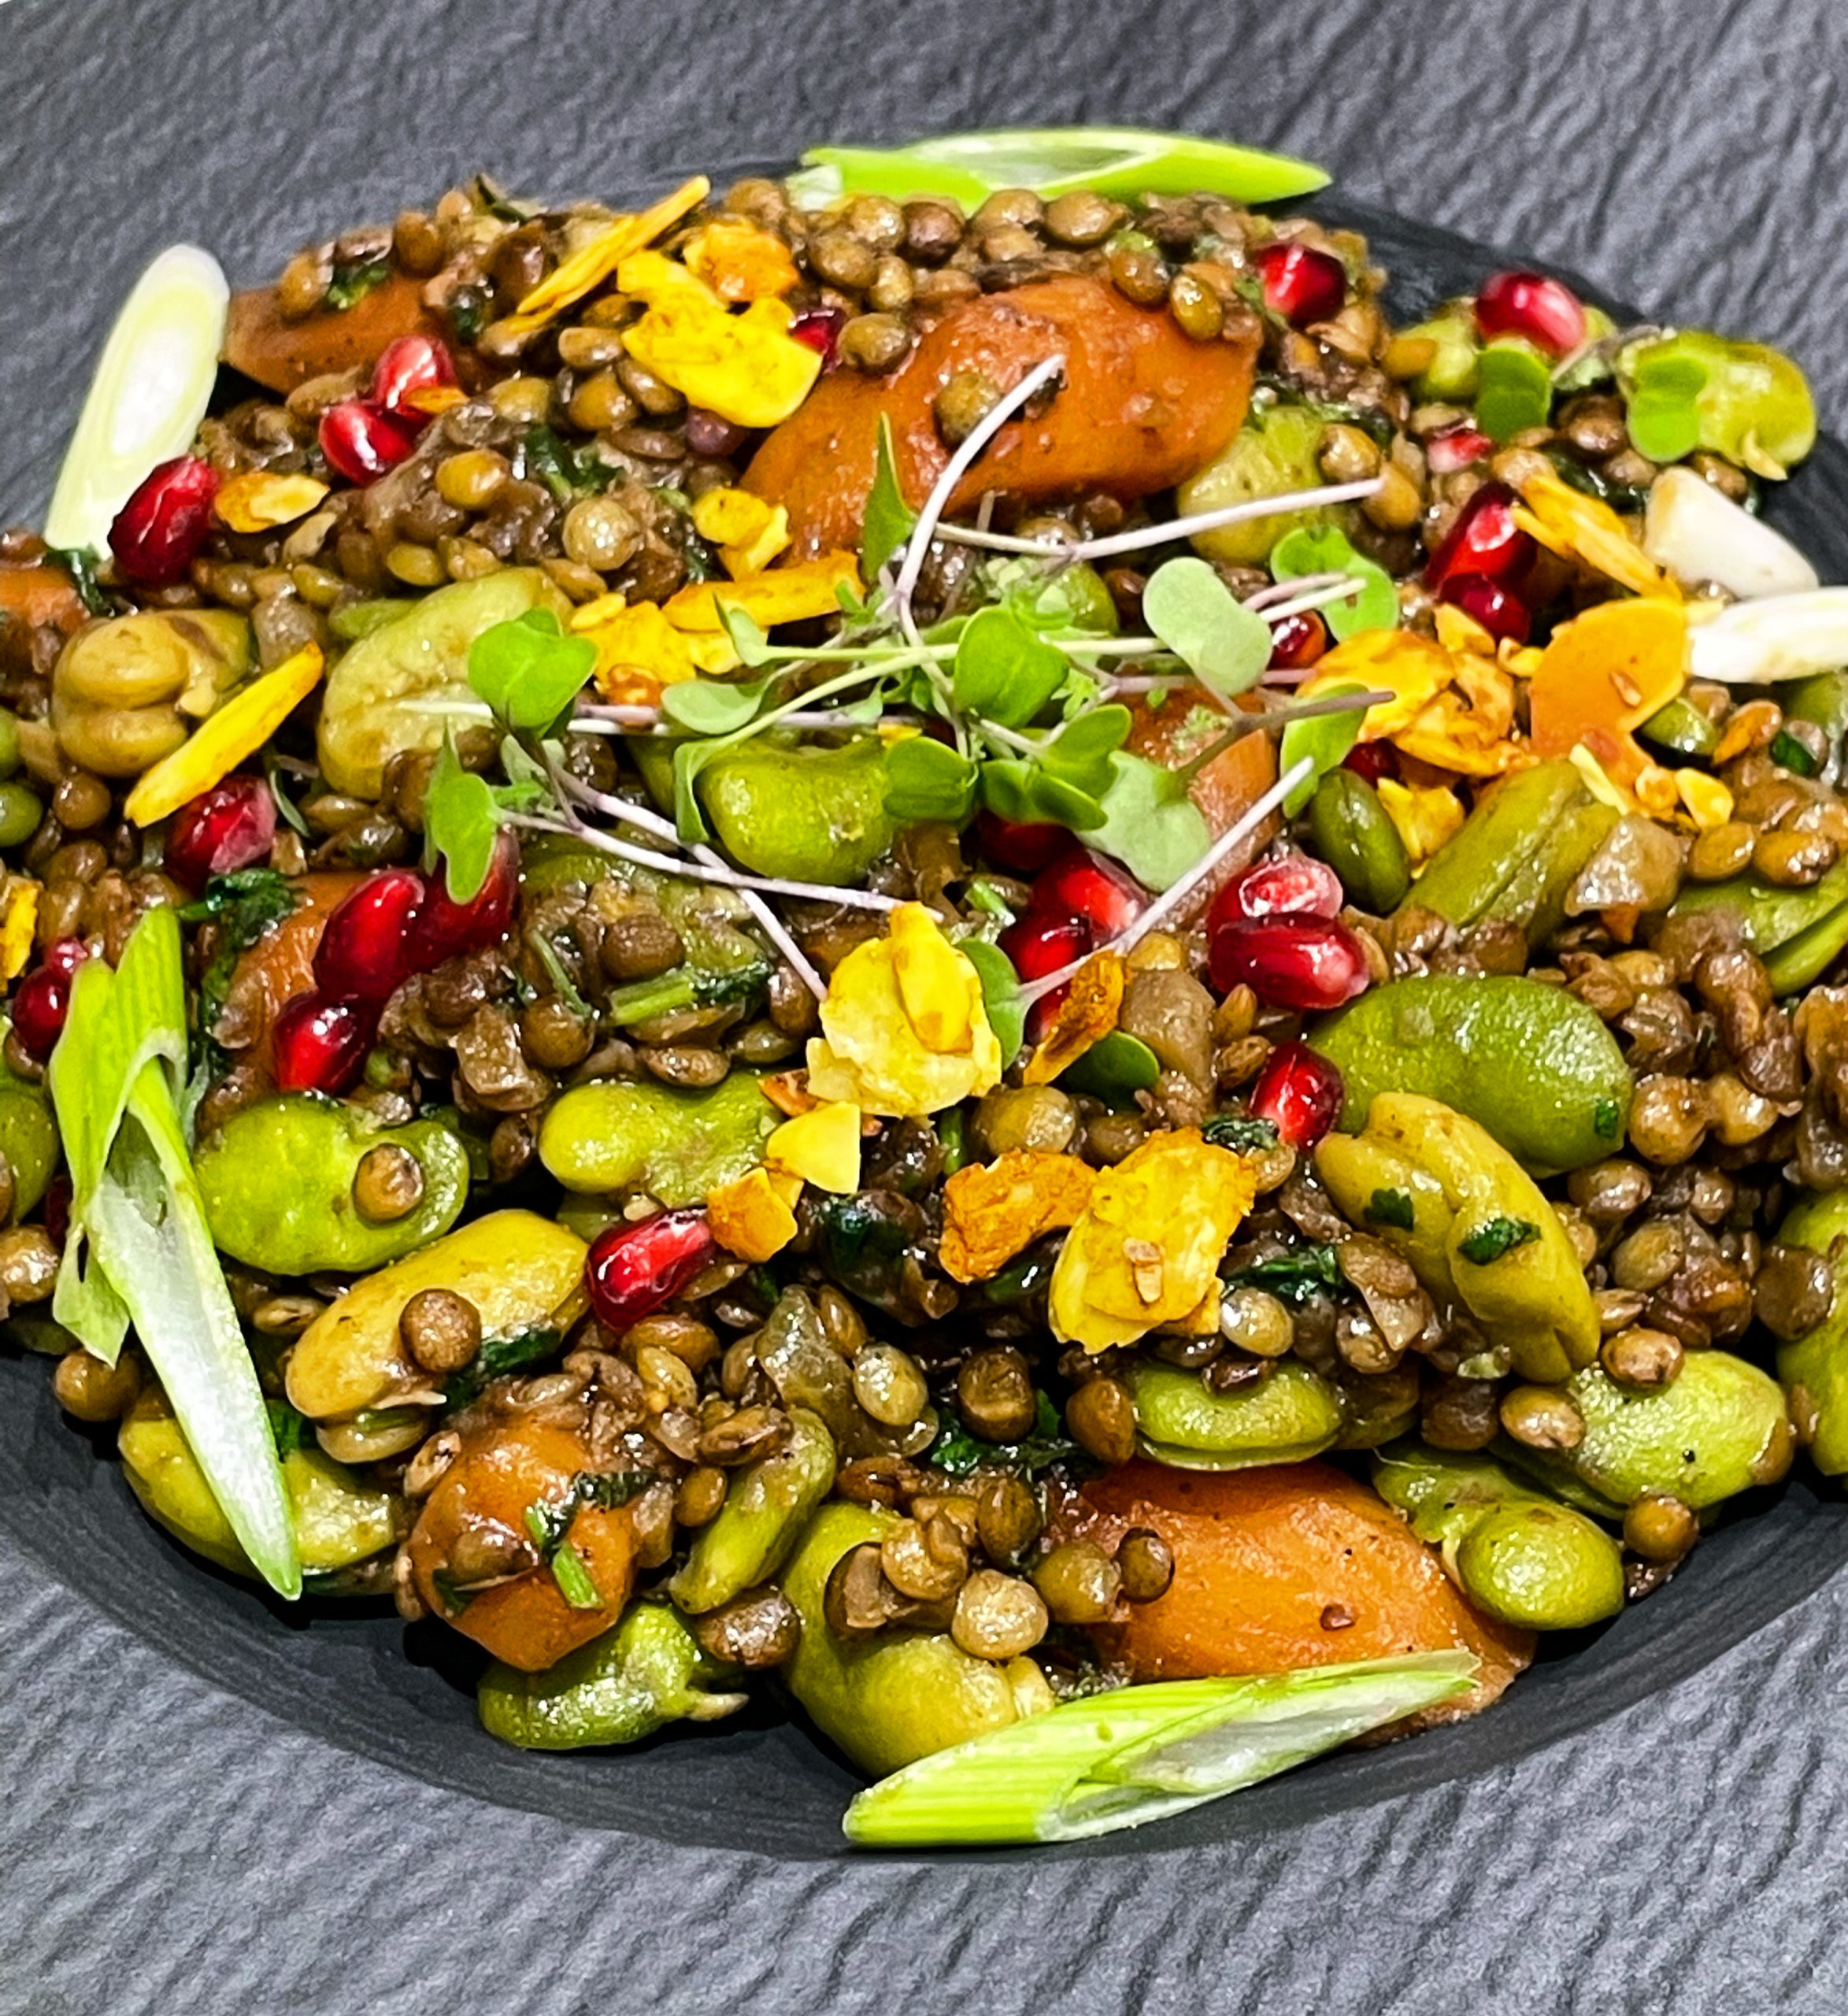
This dish came about as the result of a rummage and came together as a deeply satisfying dish. It just so happens to be dairy and gluten free and vegan friendly too!
Continue reading “Braised Carrots and Lentils”Pumpkin & Rosemary Biscuits
When I say biscuit, its part that and partly scone. Bready and toothsome, deeply savoury and just about the perfect partner with a serving of Bangers & Colcannon or a hearty rooty soup to warm the cockles on a chilly day.
Mr Flavour swears he can taste bacon in these biscuits but I assure him there’s not, because there isn’t. Pumpkins and squash have magical properties: they are the chameleon of the food world, able to be sweet and savoury and can evoke buckets of umami. That’s what he was picking up as he scoffed into a freshly baked batch. I hope!
I recommend steaming the squash, rather than roasting and boiling, to reduce moisture intake (boiling) and moisture release (roasting). Steaming retains the pumpkins goodness, natural sweetness and shape. After steaming to perfection, I allow to just sit and air for about 10 minutes. It doesn’t matter if the squash gets cool because it’s going into the dough and then being baked anyway, but its an important step in getting rid of any excess moisture which can impact texture and rise. I like to roughly mash, mostly smooth but with some texture, to add a little bit of bite and interest to the finished scone.
The dough that you made will be quite sticky, so prepare to feel deeply uncomfortable when you’re handling the dough! Also, I can’t legislate for the type of pumpkin or squash you will use – there are so many varieties and each will have a different water content. So just be aware that if you are looking at your dough thinking: this can’t be right, it’s too wet, it probably is so just add a little more flour until such time as you have a dough that you can pick up and handle – but is still quite sticky too!
I use buttermilk for an extra hit of savouryness, but you can of course use normal milk.

Ingredients (makes 12 – 14 scones using a 6cm cutter)
- 275g plain flour
- 3 tsp baking powder
- 1 tbsp caster sugar
- 1/4 tsp salt
- 1/2 tsp ground nutmeg
- 1 tbsp fresh rosemary finely chopped
- 60 g butter (chilled and cubed)
- 125 ml buttermilk (+ a little extra to brush with)
- 250 g pumpkin/squash, peeled, deseeded, cubed, steamed until tender and mashed/pureed
- Toasted pumpkin seeds
Method
- Pre heat the oven to 220 degrees Celsius, fan
- Add the flour, baking powder, sugar, salt, nutmeg and rosemary into a bowl.
- Add the cubes of chilled butter and crumble through to create a breadcrumb texture.
- Add the buttermilk and mashed/pureed pumpkin and stir everything together to combine well and to create a sticky dough.
- Flour the works surface and turn out the dough. Knead lightly into a smooth dough and form into a round about 2cm thick.
- Cut out the dough using a 6cm cutter and place on a lined baking tray. Gather the remaining dough up, and reform to cut out more. Repeat until all the dough has been used up.
- Brush each scones lightly with some buttermilk and scatter toasted pumpkin seeds on top.
- Place in the oven and back for about 20-25 minutes until doubled in size, golden and cooked through.
- Serve up with Bangers and Colcannon, or slather with the Pumpkin Spice and Maple Butter as a delicious mid-day snack.
Enjoy!
Fava & Feta Salad
Necessity is the mother of invention, and having a garden full of different peas and beans means the creative streak is at peak these days! Broad Beans, or Fava Beans, are top of the menu at the moment. Serve them up with a nice Chianti, or some Feta – like in this simple salad!
I grew up eating Broad Beans – and hated them. But that was because we never did the double-podding – we were all about maximum fibre in our house, so the pods came off but the skins stayed on. Being an adult has at least some advantages, in that now I am prepared to sacrifice a small amount of additional food prep time to pod and skin my broad beans and the rewards are worth it.
Sweet, nutty, grassy Broad, or Fava Beans, especially when they are medium sized in their pods, are just wonderful eaten raw. But if this doesn’t sit right with you, (or if you are someone partial to a bit of gustatory fluctuation when it comes to beans), a quick blanch for a mere minute should help you get around this!
So aside from the time taken to double-pod your beans, the rest of this salad will be ready in about five minutes. I served it up with some Ras al Hanout spiced and BBQ’s chicken thighs with some potatoes and leaves from the garden too, but this also works well as a topping for sourdough crostini.

Ingredients (serves 2, scales up easily):
- 2 or 3 large handfuls of Broad Beans in their pods
- 125 g Feta cheese
- 25 g pine nuts, toasted (you could also use flaked almonds)
- 1 spring onion, trimmed and finely sliced on the round
- 1 tsp sumac
- Extra Virgin Olive Oil
- Sea Salt, Black Pepper
- 1 tsp of lemon zest and juice from 1/4 of a lemon
- Handful of herbs, roughly chopped: oregano and chive work well.
Method:
- Remove the beans from their pods, remove the skin. If the beans are small to medium sized and sweet, they can be eaten raw. Any bigger and I would recommend blanching for about a minute before refreshing in iced water. If the thought of eating raw beans isn’t for you, whatever the size of the bean, then do this too!
- Drain the beans, place into a bowl.
- Crumble over the feta cheese, add the spring onion.
- Toast the pine nuts (or flaked almonds) in a dry pan. Set aside to cool slightly.
- Sprinkle the Sumac over the beans and feta. Add a small pinch of sea salt (the feta will already be salty), and a grind of black peppercorns.
- Add the lemon zest and juice and a generous glug of EVO (about 1 tablespoon). Chuck in the herbs.
- Mix all together and serve.
Enjoy…with a nice glass of Chianti, maybe. Fuhfuhfuhfuhfuhfuh…!
Blackcurrant & Lemon Verbena Ripple Mousse
Hooray for Blackcurrant season! It is REALLY difficult to get blackcurrants in Ireland … so imagine my delight when they appeared in a Fruit n Veg Box from Dunworley Cottage!
Growing up, we had, what seemed to me, hundreds of Blackcurrant bushes in our fruit garden. I know because it was down to me to go out and pick the feckers all summer long! But there’s nothing quite like the scent that wafts from the leaves of the blackcurrant plant, and the sweet but tart bite of the pearlescent black and purple fruits.
I also have some Lemon Verbena growing in the garden – one of those old fashioned herbs that became the darling of chefs a few years back. Its wonderfully aromatic, and to eat it reminds me of Lemon Sherbet – like lemony popping candy – a pure delight! But what to do with it?
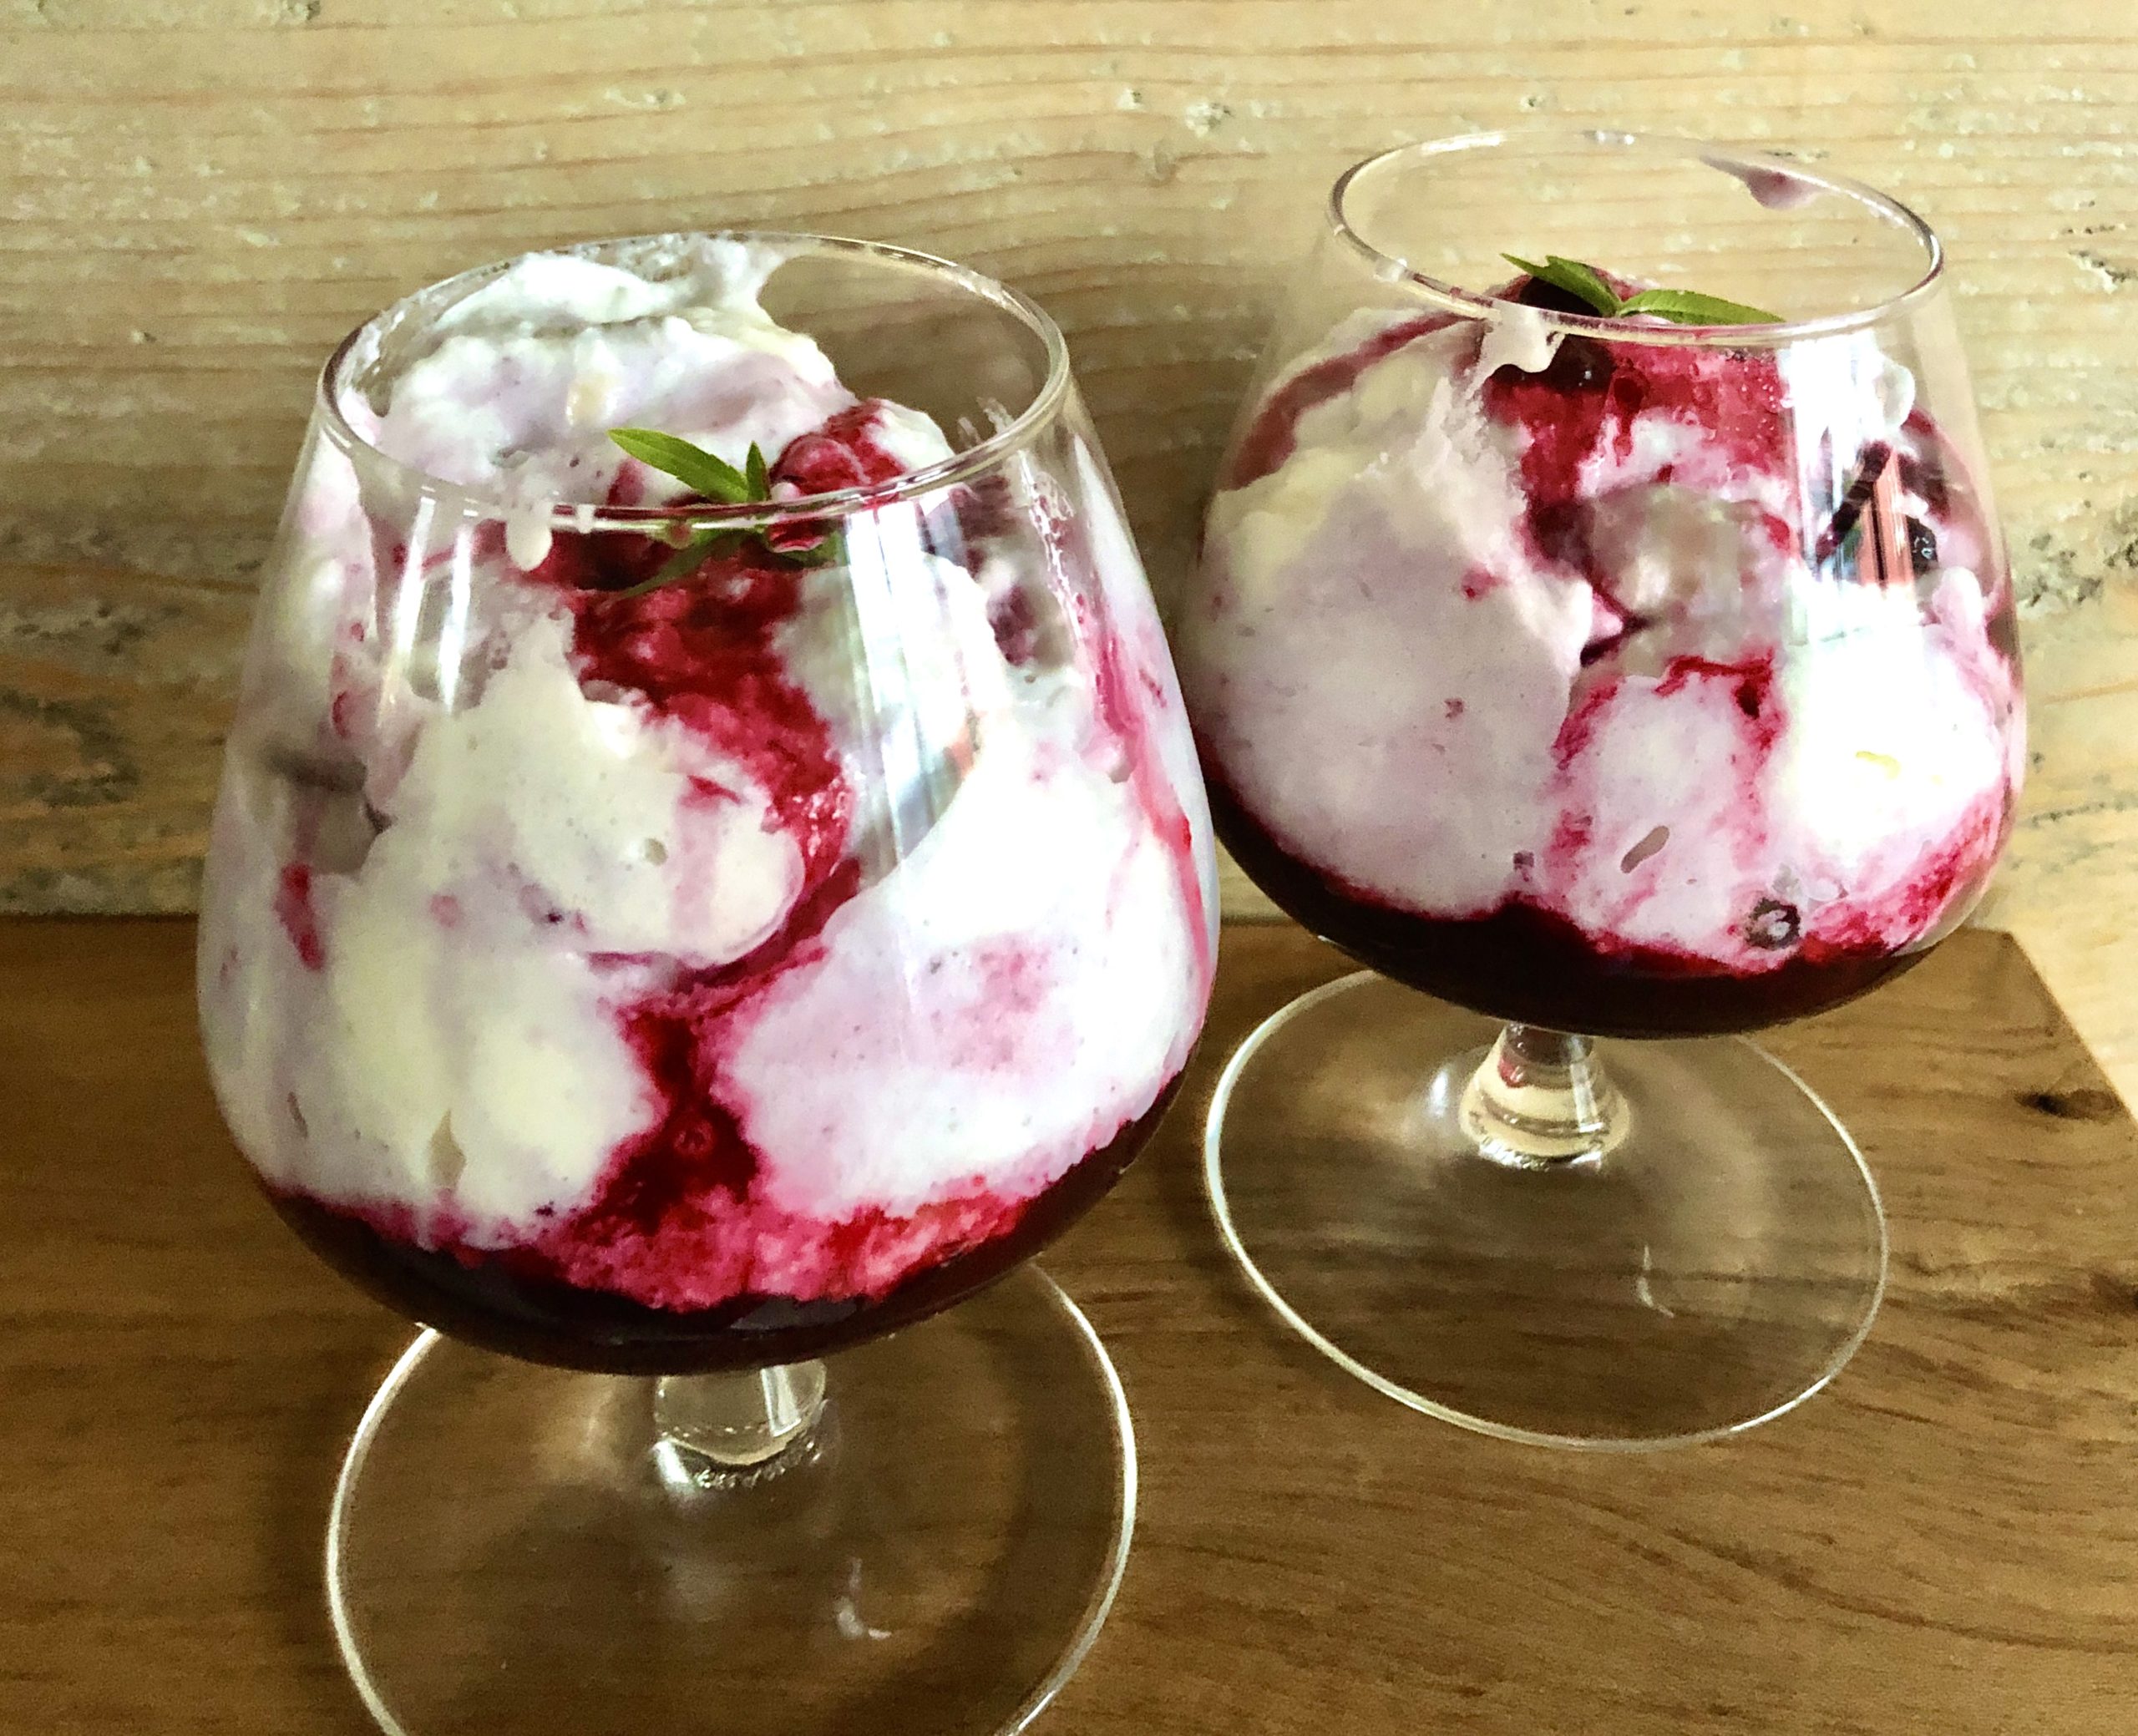
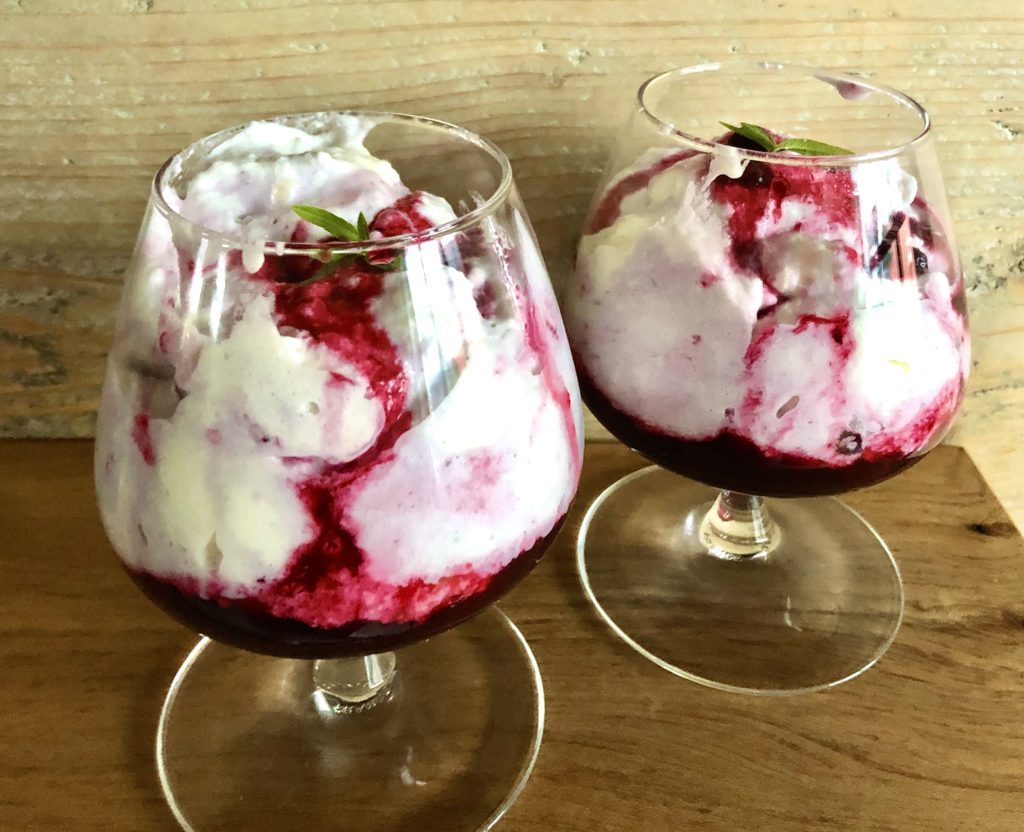
I decided to make a compote of the Blackcurrant scented with Lemon Verbena, and then I decided that the zingy lightness of the Lemon Verbena leant itself to a delightfully fluffy, and light as a feather, Summer Mousse. This is the recipe, and be quick: Blackcurrant season isn’t long, despite my childhood memories, and this year seems to be an exceptionally good year for them – so indulge as much as you can!
Ingredients:
For the Compote
- 200 ml water
- 150 g white sugar
- 350 g blackcurrant
- 4 sprigs of lemon verbena (substitute for lemon zest)
For the Mousse
- 250 g double cream
- 3 medium egg whites
Method:
- Into a heavy-bottomed saucepan over a medium-low heat, add water, sugar and lemon verbena sprigs, stir until the sugar is dissolved.
- Add the blackcurrants and cook for 8 minutes. Remove from heat and carefully remove the sprigs of lemon verbena with tongs (it’ll be very hot!)
- Allow the compote to cool fully before making the mousse mix.
- When the compote is cooled, in one bowl whip the cream and in the other whisk the egg whites to a stiff peak.
- Take one spoonful of the egg white and fold into the cream gently. Repeat until all the egg white has been folded into the cream. Do this all as gently as possible so as not to loose any of the air out of the mix.
- Swirl two generous tablespoons of the compote into the mousse mix and very gently stir through so the compote ripples through the mousse.
- Into a serving glass, place an amount of compote in the bottom, followed by some of the mousse mixture and top with another spoon of the compote. Garnish with a sprig of fresh lemon verbena, take up your spoon and dig in with glee.
Enjoy…
Organic Fruit & Veg Boxes available from Dunworley Cottage: https://dunworley.com/fruit-veg-boxes/
Cherry Amour

Part of a collection of recipes I’m calling My Purple Passion

I had been knocking around in my head the idea for this cocktail ever since I made the Cherry Brandy Brownie. There was something so heady about the combination of cherry and chocolate that sent me off in search of a cocktail that would make the most of those flavours in a truly adult way.
If you’ve ever read my Tea with Granny series of blog posts, you’ll know that Black Forest Gateaux holds a very dear and special place in my heart. I also created for you one of the best cake recipes I’ve ever concocted as a ridiculously sumptuous version of an old classic. Check out those posts HERE and HERE. So, in a way, this cocktail is like a Black Forest Gateaux but in a drinkable form and oh so adulty!
What took me so long in getting round to making it was trying to figure out how, in the middle of a pandemic, could I get my hands on a Chocolate Bitter. In the end I decided to make my own using just three ingredients and one patient week of waiting. The good news though is that, like with all bitters, you only need a little to go a long way, so you’ll have enough for 6 cocktails with what you make here.
Equipment wise, you’ll need a cocktail shaker – my current one is plastic and broken so you know, whatever works…even a clean jam jar with a tight fitting lid would work. Something to accurately measure your measures with, lots and lot of ice and a fancy pants glass to drink from. Simples.

Ingredients: Makes 1 Cocktail
For the Homemade Chocolate Bitters
- 1 tbsp of roasted cocoa nibs
- 1 tbsp of cocoa husks (also known as Cocoa Husk Tea)
- Enough Irish whiskey to cover fully – about 150 ml
- Both the Nibs and Husks can be purchased from Exploding Tree
For the Cocktail
- 50 ml Irish Whiskey (I used West Cork Distillers 10 year old)
- 75 ml Kinsale Mead ‘Wild Red Mead’ (flavoured with cherries and blackcurrants)
- 125 ml tart organic cherry juice (e.g. Biona)
- 1 tsp of Homemade Chocolate Bitters
- 1 egg white
- Ice
Method:
For the Homemade Chocolate Bitters
- Place all into a sterilised glass jar with a tight fitting lid, shake and store in a cool, dark place for a week.
- Strain the liquid from the solids using a tea strainer or a piece of muslin cloth.
- Store in a sterilised jar or bottle.
For the Cocktail
- Add all the ingredients into a cocktail shaker, fill with ice and shake vigorously for 30 seconds or until a thin sheen of ice appears on the outside of your cocktail shaker.
- Pour into a martini glass and garnish with some more roasted cocoa nibs.
Cheers!
Goat-Goat-Beet
Part of a collection of recipes I’m calling My Purple Passion
So, I hold a deep conflict when it comes to anything Goaty. If I ever have enough land to keep animals, the first thing on my list would be a goat. They are such lovely creatures – cantankerous but full of personality. When my parents used to live in the Welsh mountains, they had three Cashmere Mountain Goats called Flymo, Black and Decker – I know, you don’t need to say anything. Aside from my parents and their dogs, I always looked forward to seeing the goats. I’ve loved them ever since, but the thing is, I also adore their milk, yogurt, cheese and, yes its true, their meat.
In the past few years, goat meat has been appearing on menus here and there and across the country there are a small number of goat farms raising goats for their meat. It’s been hailed as a sustainable alternative to meat production and consumption, but it isn’t a cheap meat and, for the most part, producers in Ireland mostly service the restaurant industry. But, with Covid-19 that market has been lost to the producers and are focusing their efforts to sell direct to normal customers, like you and me, a lot more. This is great news for those who have been curious about working with goat meat, but found it difficult to source exceptional quality, Irish reared goat to cook with at home.
There is Broughgammon Farm in the north of country, and a scattering of others around the midlands. Down south is the wonderful Ballinwillin House in Mitchelstown, Co Cork. On this farm on an old estate, Pat and Miriam Mulcahy produce wild boar, venison, beef and goat meat all grass fed and semi-free range. Everything happens on site, including their own abattoir, butchery and smokehouse. In terms of production, it has virtually zero food miles – that and, of course, it is meat of the most exceptional quality.
Thanks, in part, to Covid-19, Ballinwillin House is now selling their produce through Neighbourfood – an excellent initiative that I have championed since the first collection day in the Old Apple Market in Cork city on a bitterly cold and wet winters’ evening in 2018. Ballinwillin are a newcomer to our corner of the world here, through Neighbourfood. Choosing items for my weekly order, I stumbled upon their Goat Salami. A lover of salami, you can imagine, I was immediately intrigued so that went in the cart. Then I spotted that the lovely Siobhan from St Tola Goats Cheese was also starting to sell that week, and her newest product, St Tola Divine, described as a fresh and creamy goats curd, also caught my eye, so that went in the cart too.
I had a suspicion that these two ingredients would be a dream together: the rich funkiness of the goat salami and the sweet silkiness of the goat curd. And what goes so well with goats cheese? Beetroot of course! And what goes well with beetroot? Fennel and Chili, naturally – a favourite flavour combo of mine that I discovered many years ago when I developed my classic Beetroot, Fennel and Chili Soup (check it out here!).
The only cooking in this dish really is steaming, peeling and slicing the beetroot. But look, if you can’t be bothered to do that you could substitute for those ready cooked and peeled vac-packed beets you can get in the supermarket these days, but you know I’ll always prefer to encourage people to buy beets that have been grown seasonally and locally because, frankly, there is no comparison on taste!
What I will say is this: this dish deserved its place in My Purple Passion collection of recipes. So simple, and so delicious served as a summery shared starter al-fresco in the late evening sunshine. Best served with fresh bread – we found a pillowy focaccia works best.

Ingredients – this will serve 6 – 8 people as a nibbly starter
- 100 g Ballinwillin House Goat Salami
- 30 g St Tola Divine Goats Curd
- 2 large fresh beetroot, steamed, peeled and thinly sliced
- 1 tsp Maldon sea salt
- 1/8 tsp fennel seed
- 1/8 tsp chili flakes
- Fresh thyme, leaves and flowers
- Extra Virgin Olive Oil
Method:
- If your beetroots come with their leaves still attached, remove them and save them to use as you would chard or spinach another time.
- I find steaming the beetroot whole works best as you don’t lose flavour and is a very gentle way of cooking. Depending on the size of the beetroots, this should take around 30 – 40 minutes. They need to be cooked through, but I prefer the beetroots to retain a small bit of bite to them, but you may prefer them softer still so then cook until completely tender all the way through.
- When cooked, allow the beetroots to cool slightly so you can handle them to peel them. I use a small pairing knife to scrape, rather than peel, the skins off. Top and tail and slice thinly using a knife or, if you have one, a mandoline.
- In a pestle and mortar, place the salt, fennel seed and chili flakes. Grind into a seasoned salt mix.
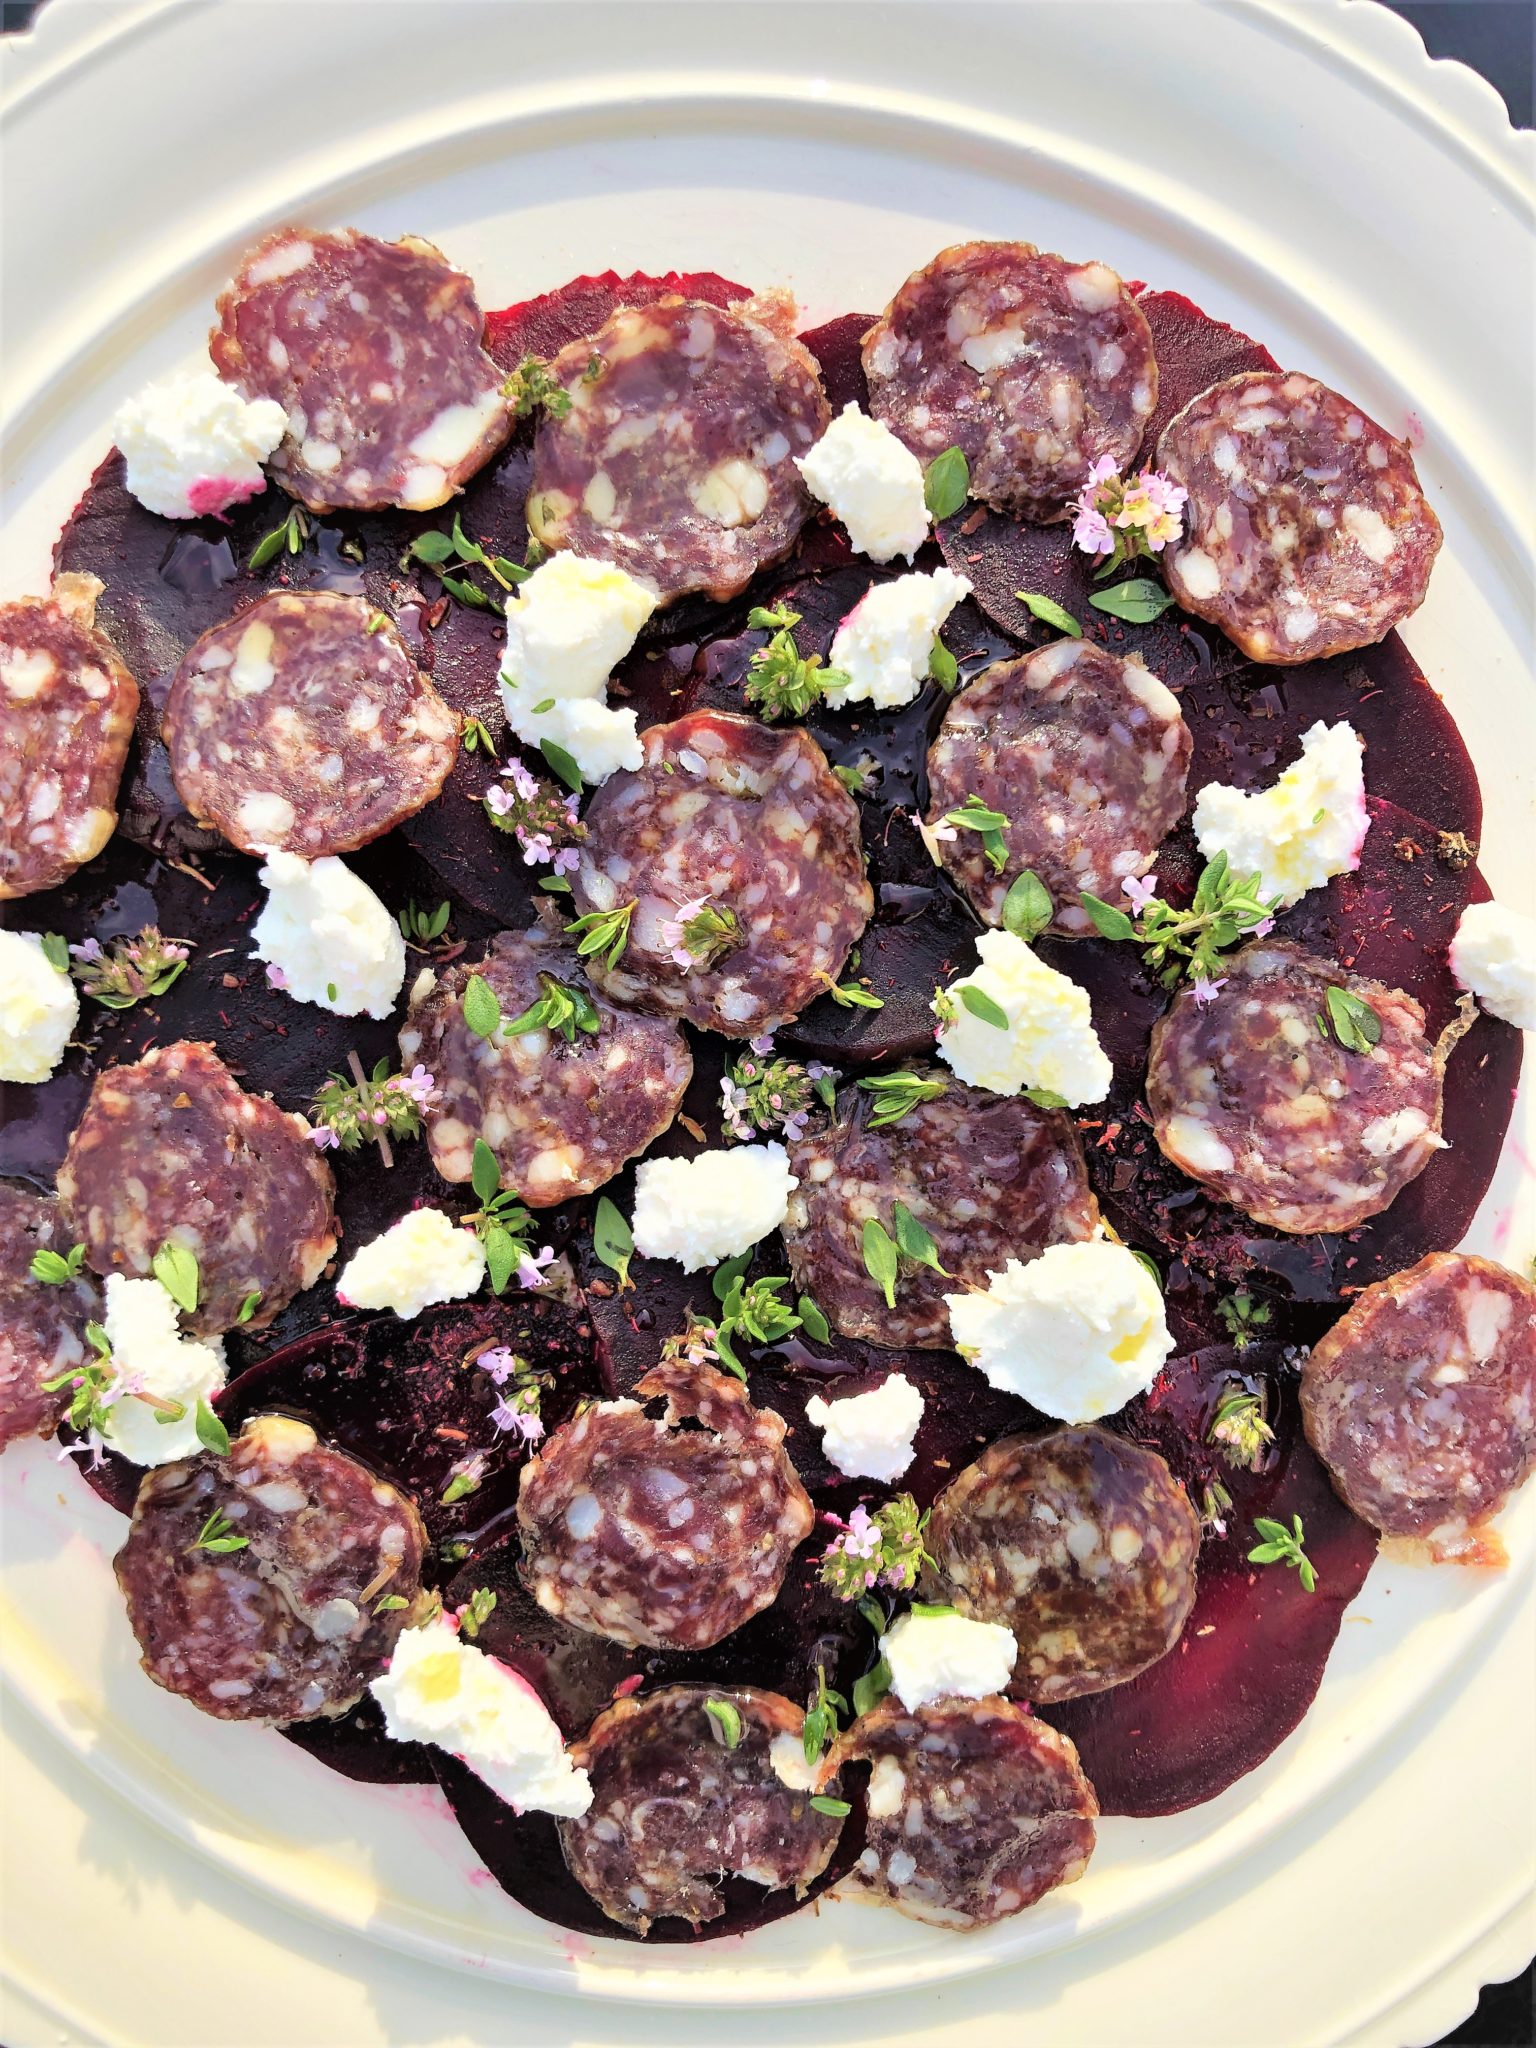
- Arrange the disks of beetroot on a platter and scattered all over with the salt mix.
- Arrange slices of the goat salami on top and add small dabs of St Tola Divine Goats Curd.
- Finally, dress with some fresh thyme leaves and flowers if you have them, (they are delightfully pinkish in hue too), and drizzle over with some great quality EVOO.
- Serve with focaccia bread, and a glass of crisp, dry white wine.
Enjoy!
Cherry Brandy Brownie
Part of a collection of recipes I’m calling My Purple Passion
Right back at the beginning of the pandemic, I, on purpose, installed myself on an almost permanent basis in the kitchen. Of course there was the day to day business of cooking enough food to keep up well fed and happy, including snacks, but there was also a backlog of recipes that I was long overdue to test…some for this blog, some for another project I’m working on. I cracked on, cooking dish and dish and generally procrastinating about work and study. Back then I definitely didn’t think I should be reserving my energies and enthusiasm for as long a haul as it has been, and is still yet to come. I guess I just thought I should get through The Backlog as soon as possible before everything returns back to normal. Well, folks, lets just say this: don’t rely on me to predict the future of anything. I’m clearly useless! Anyways, after my fit of cookery began to equalise out to something much more sensible, one evening, scrolling through the seemingly unending collection of photographs of the food cooked over the past 12 weeks, and I noticed a bit of a trend – towards purple food. Purple like: red onions which I am currently addicted to roasting in the wood fire; red cabbage in so many different variations of chopped slaw salads, beetroot and, my favourite fruit of all, cherries.
So this blog post kicks off my homage to these purple foods that have kept me company. Three recipes in total: this ridiculously delicous recipe for a Cherry Chocolate Brownie that is definitely only for adults, a delicious starter of Beetroot, Goat Salami and Goats Curd with Fennel and Chili Salt, and finally my indulgent Cherry Amore cocktail. I hope you enjoy them.
It’s probably not a coincidence, but one of my favourite writers in the world is Alice Walker, and The Color Purple is probably one of my favourite books. One of the most famous lines in the book is thus:
“I think it pisses God off if you walk by the color purple in a field somewhere and don’t notice it. People think pleasing God is all God cares about. But any fool living in the world can see it always trying to please us back.”
Now, religious is the last thing I am, but replace God with nature and that’s where you’ll find me!
To kick off proceedings, I made this Cherry Brandy Chocolate Brownie at the very beginning of Lockdown in Ireland. Cherries were coming in season and my friend and Chocolate Maker extraordinaire, Allison Roberts of Exploding Tree, was, (still is), selling Experimenters Kits containing Raw Cocoa Beans, Roasted Cocoa Nibs, Coconut Blossom Sugar, Untempered Cooking Chocolate and a bag of Cocoa Husk Tea. Experimenting with these brownies was the first thing on my list!
I used fresh cherries here, but you could use tinned – just don’t throw away the juice! If you are using fresh cherries, allow at least two days for them to macerate in the juice, sugar and brandy before making the brownie mixture. If course, if you’d like to make these for your precious little ones, just leave out the brandy. Shame, but needs must – this I understand!

Ingredients – makes 12 – 16 brownies depending on portion size!
For the macerated cherries:
- 125 g cherries, pitted and halved
- 3 tbsp of coconut blossom sugar or golden caster sugar
- 150 ml tart organic cherry juice
- 100 ml brandy
For the brownie mixture:
- 265 g butter, cubed
- 265 g dark chocolate – I used Allison’s Oat Milk Chocolate (60%)
- 125 g plain flour
- 1 tsp baking powder
- 300 g coconut blossom sugar or golden caster sugar
- 4 eggs
You will also need:
- Velvet Cloud Sheeps Yogurt
- Retain the liquid from macerating the cherries
- More chocolate for grating over
- Thick cream whipped to a soft peak
Method:
- Place all the ingredients for macerating the cherries into a sterilised jar. Close the lid tightly and shake. Leave that to work its magic for at least two days. Give it a shake each day. No need to refrigerate but keep out of direct sunlight or sources of heat.
- To make the brownie, preheat your oven to 180 degrees Celsius, and line a 22cm square brownie tin.
- Place the butter and chocolate in a glass or metal bowl over a gently simmering saucepan of water. Ensure the water doesn’t touch the bottom of the bowl, melt gently and stir together. Take off the heat and set aside.
- Beat together the eggs and sugar until fluffy, then add the chocolate mixture and stir well to combine.
- Mix the baking powder through the flour then add the flour mix to the chocolate and egg mix gradually to ensure a beautifully smooth texture.
- Drain, but retain, the liquid from the cherries. Add about half the cherries to the batter mix, stir through then pour into the prepared baking tin.
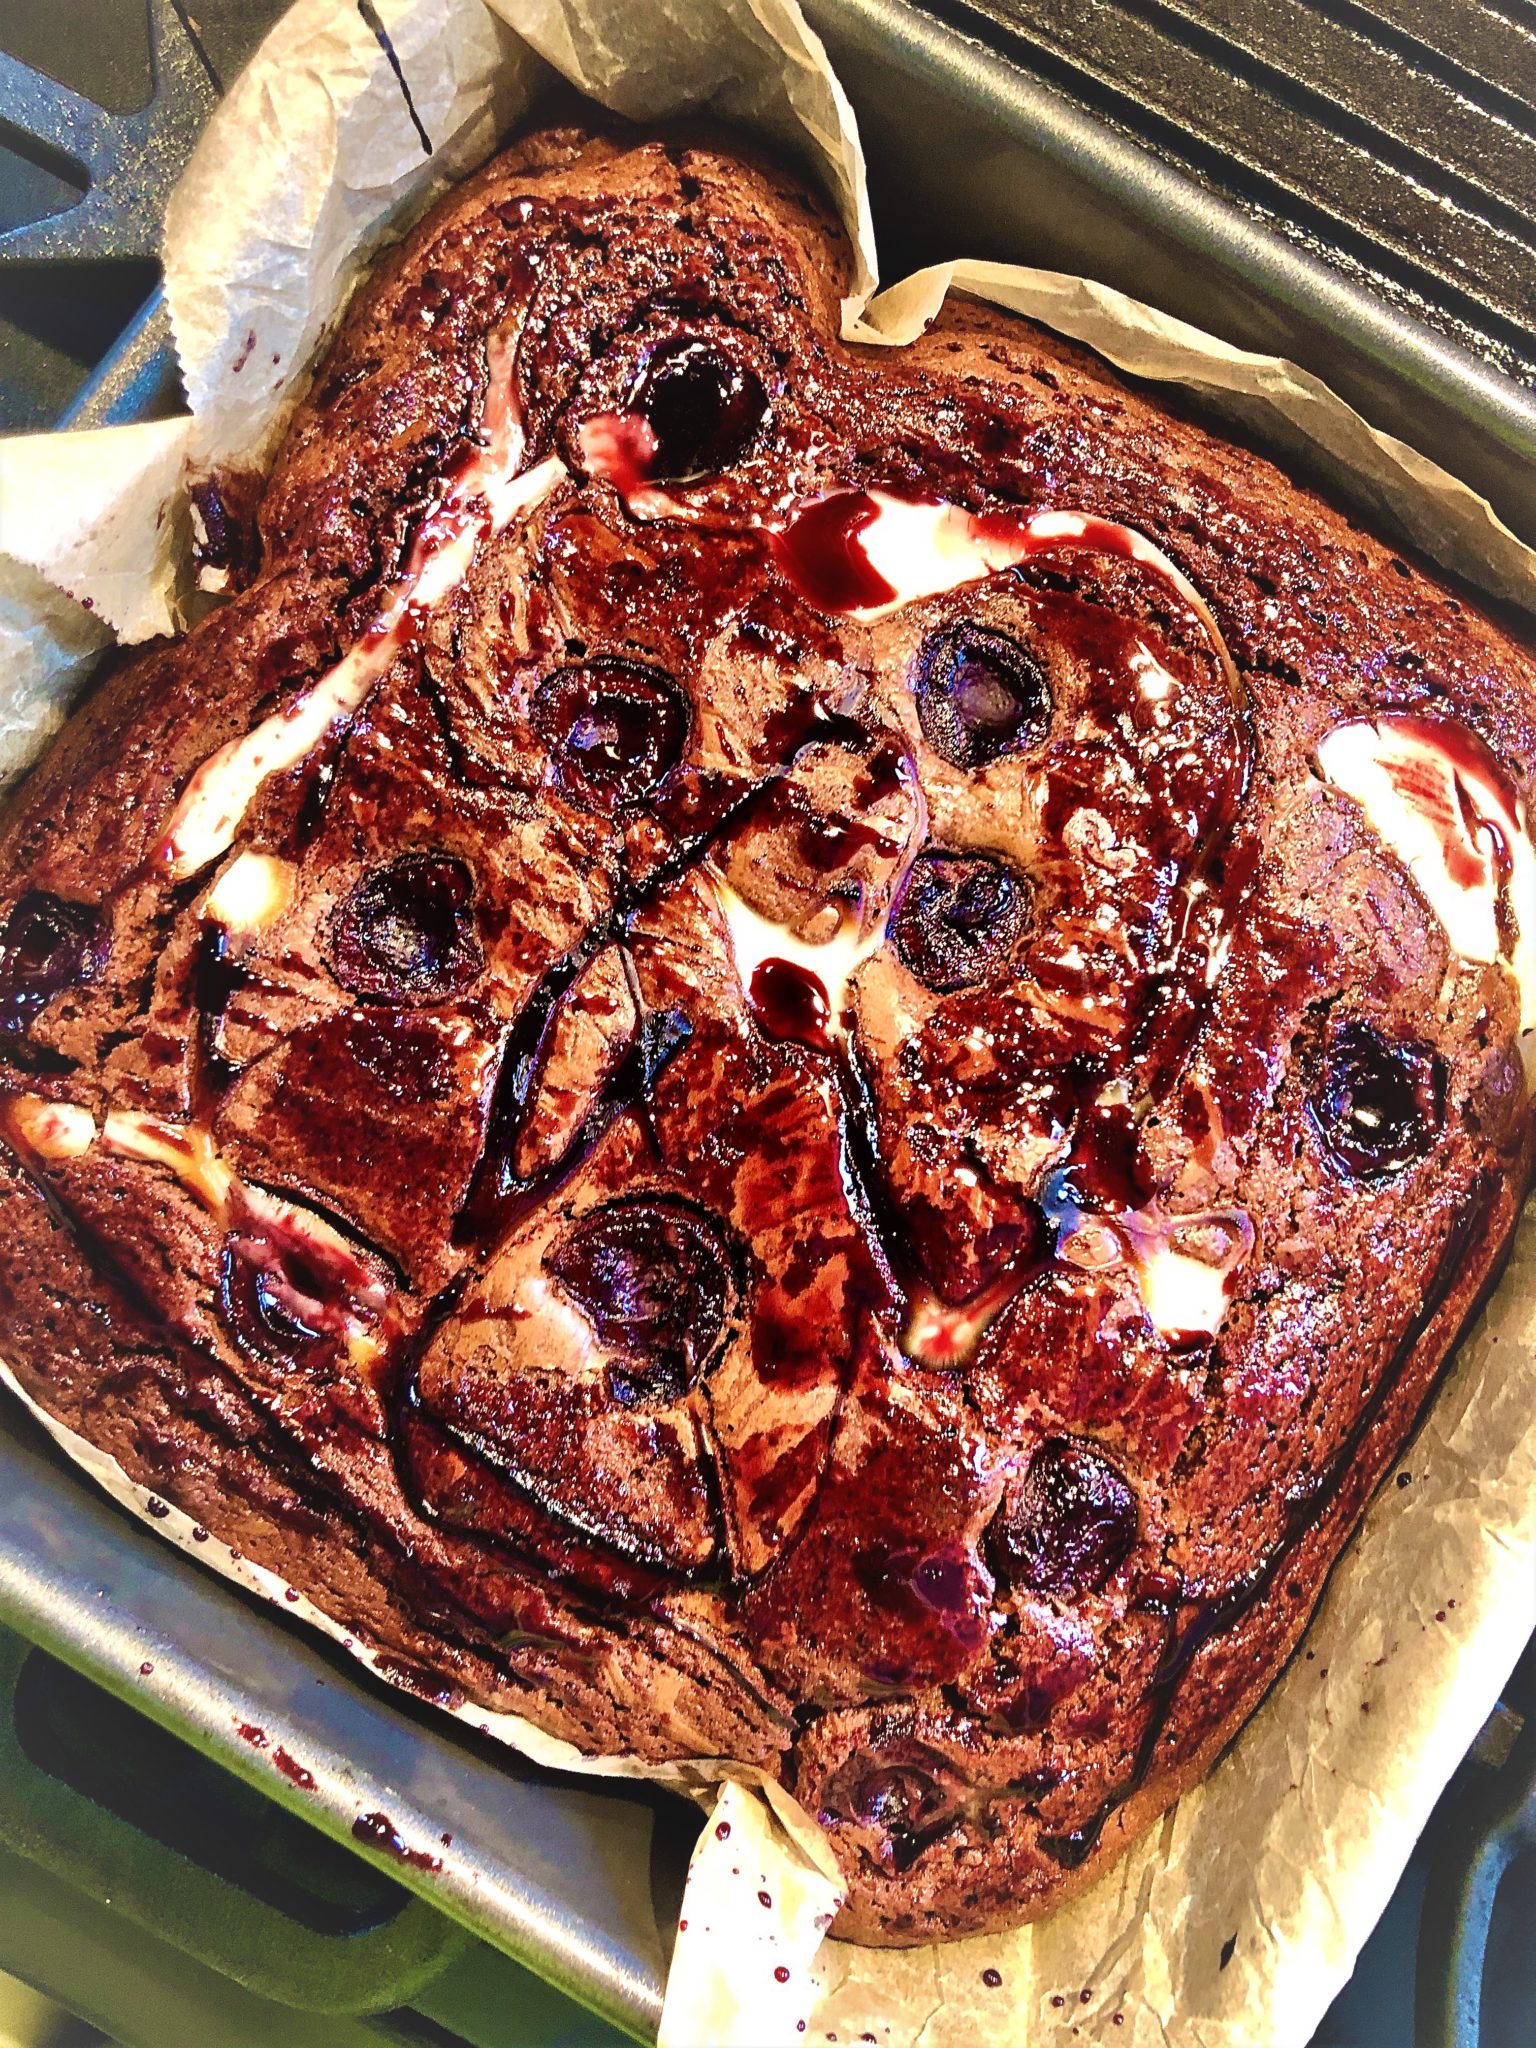
- Place the remaining cherry halves so they just sit in the brownie mix without sinking, and drizzle thick, silky lines of Velvet Cloud sheep’s yogurt over the top.
- Bake in the oven for between 40 – 45 mins. I prefer my brownie to have a crust on top, mostly solid with a slightly fudgy but not oozy centre. Ideally things should still wobble a little under the crust. As the brownie cools down it will firm up, so don’t fret too much!
- Remove the brownie from the oven and allow to cool in the baking tin for 15 minutes.
- Meanwhile take the reserved cherry and brandy juice and place into a saucepan. Bring to a boil, reduce to a simmer to thicken and reduce the sauce by about a third – it should coat the back of a teaspoon.
- Use a bamboo skewer or something similar to make small holes all over the surface of the brownie. Using a pastry brush, brush over the reduced cherry stock to soak into the brownie. Be generous, but don’t use it all up otherwise the brownie will collapse. Reserve it for drizzling over when serving!
- Cover and place in the fridge to cool right and firm up.
- To serve, remove from the baking tin and cut into squares (between 12-16 depending on portion size – I am not here to judge!).
- Plate a square of brownie, grate over some more chocolate, drizzle over some of the left over cherry stock and serve with a generous mound of pillowy whipped cream.
Enjoy!
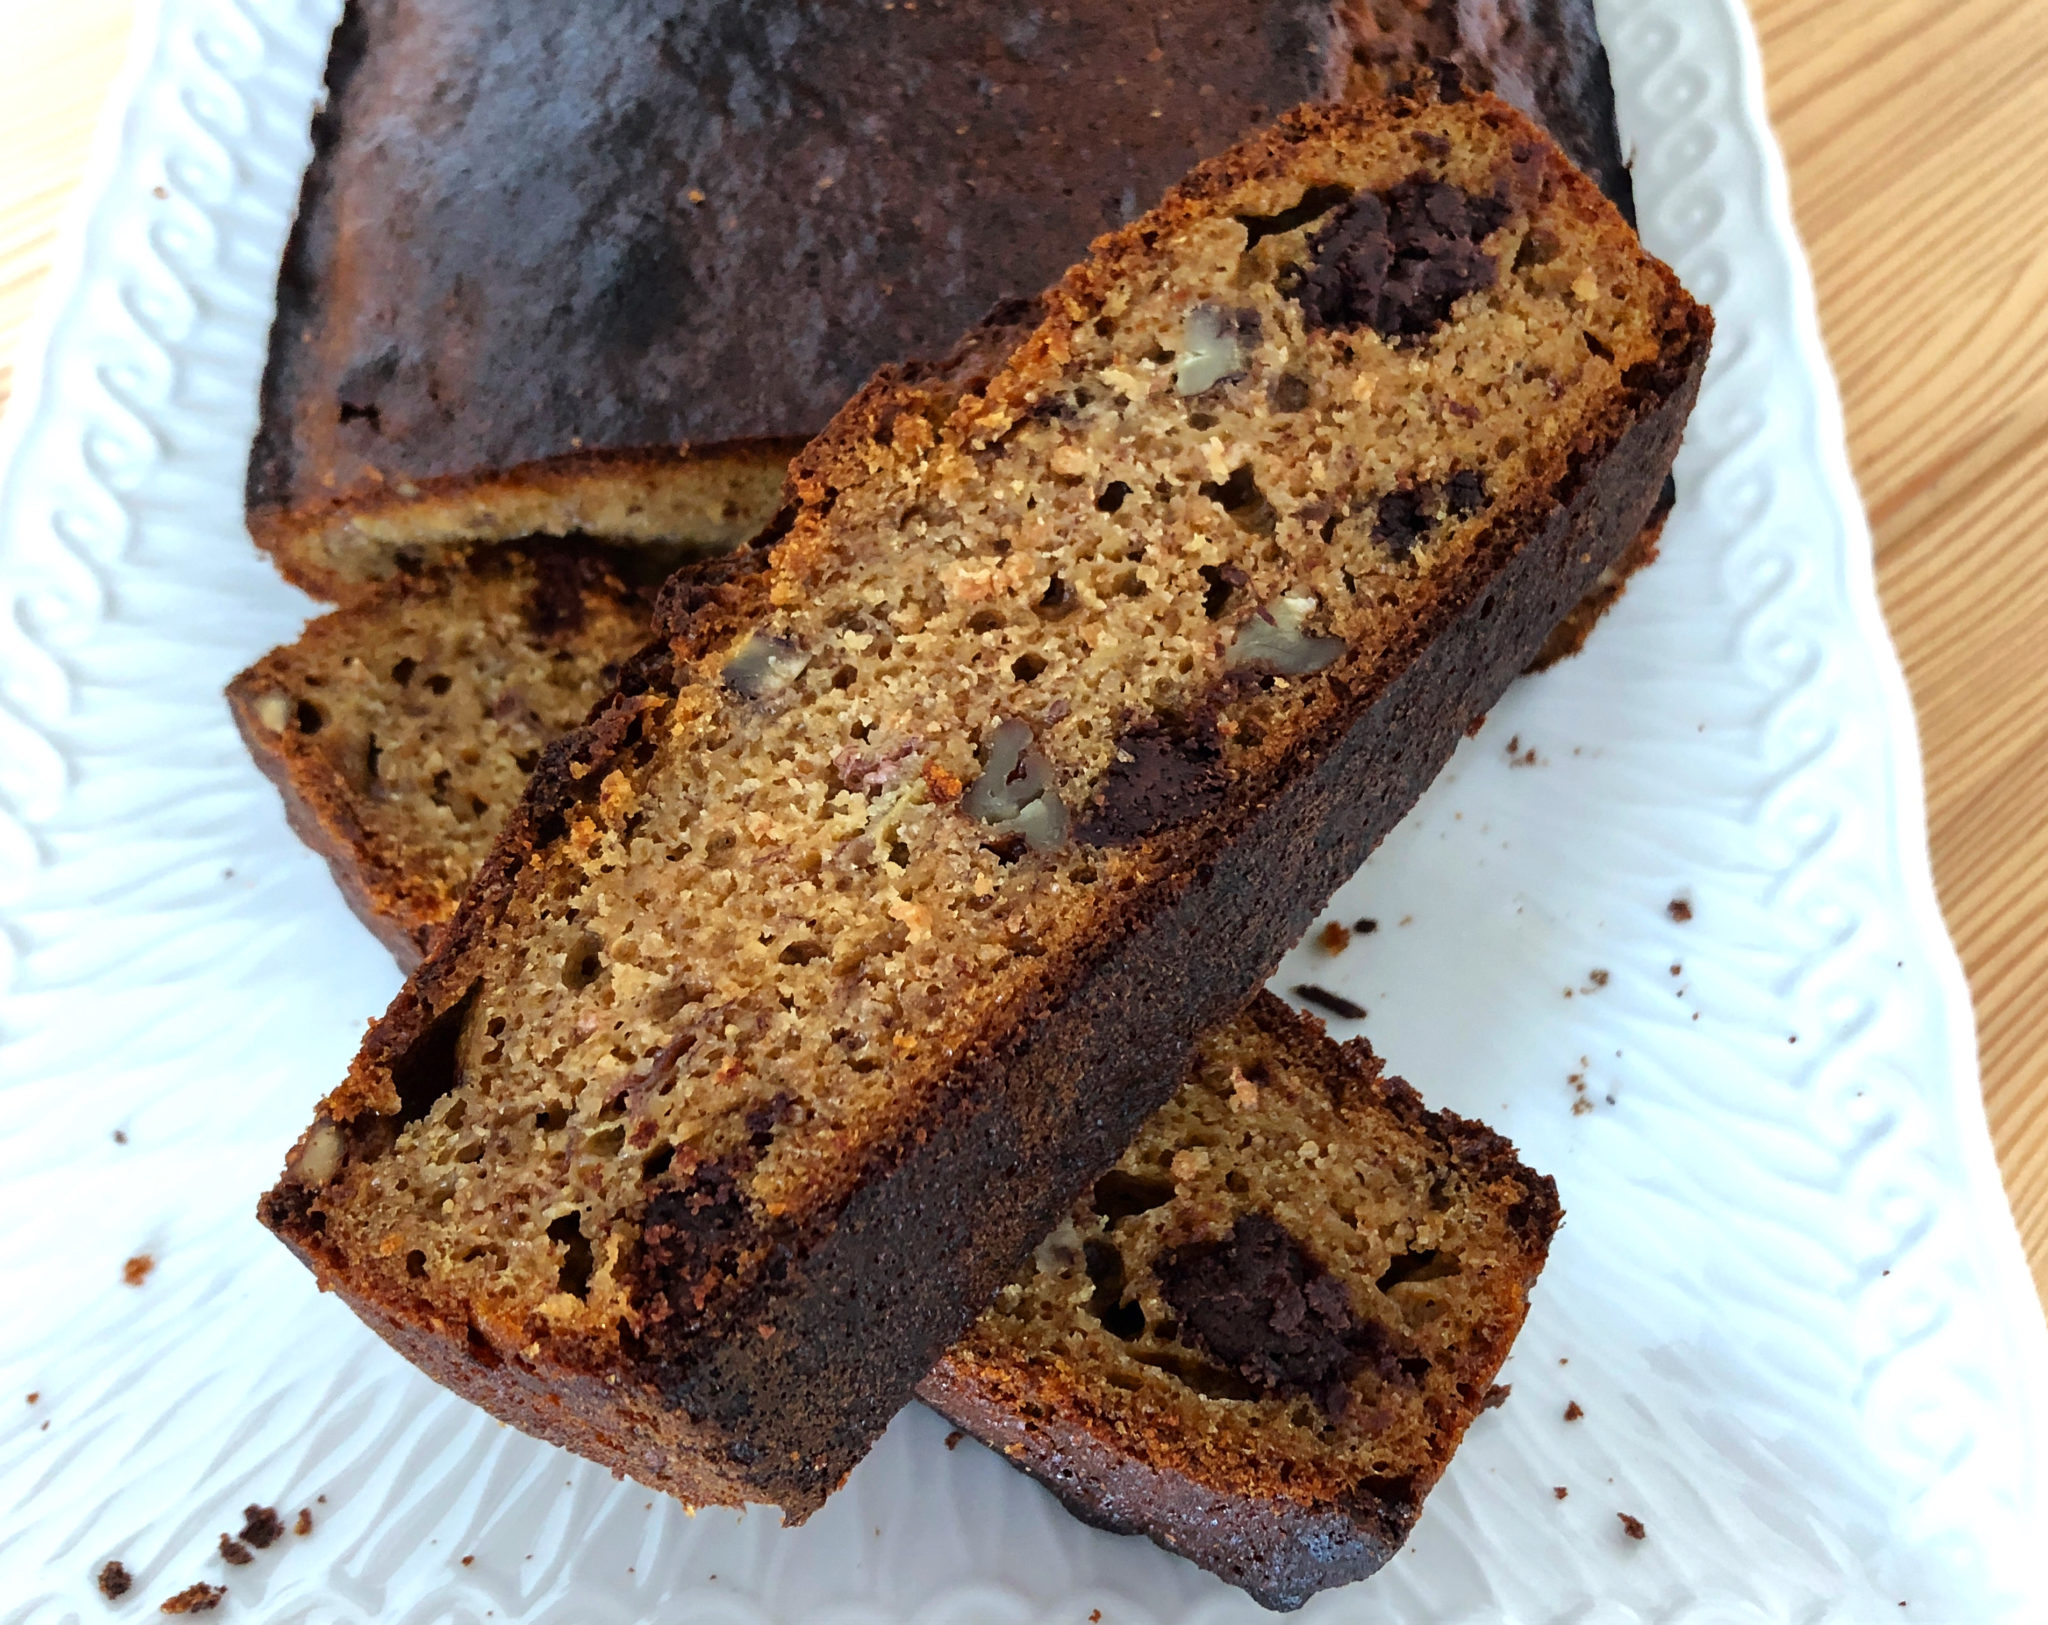
Awesome Banana Bread
So, for some reason everyone has started making Banana Bread! I think it must be because we all went out and bought a crate load of bananas at the beginning of the crisis and now their just too ripe to eat but oh so good turned into Banana Bread, (or awesome pancakes…more on that another time!)
Even Stephen Fry got in on the act, so I was delighted when the three bananas left in the fruit bowl reached the point of no return and I was ready in a flash to get going with my trusty recipe!
Now, I’ve been using this recipe for the bones of twenty years! It started as a WeightWatchers recipe and then I quickly substituted all the healthy stuff for delicious things and improved the whole thing massively as a result. I don’t know why I’ve never thought to share this, but seeing as everyone is stuck in their kitchens with a couple of over ripe bananas in their fruit bowl and too much time on their hands, it seems like as good a time as any to finally share it with you!

Top Tip: Use a loaf tin for this. A nice little 1 lb loaf tin will give you a compact and high loaf, a larger tin a longer, thinner loaf; or if you have some individual mini loaf tins or even paper muffin cases you can use that too, but adjust the cooking time as needed: the smaller the portion the quicker the cook.
Ingredients:
- 200 g Self Raising Flour
- 1/4 tsp of Bicarbonate of Soda
- 75 g of butter, plus extra for coating the loaf tin
- 75 g of sugar (demerara and coconut blossom sugar are great for added caramel flavours)
- 1 tbsp of honey
- 2 eggs
- 2 or 3 ripe bananas, mashed
- Handful of chopped nuts (walnut or pecans are perfect)
- Handful of chocolate, a 50% dark milk chocolate is great
- If you want, add some sultanas or even some fresh blueberries.
Method:
- Pre heat the oven to 180 degrees Celsius fan.
- Butter the loaf tin.
- In a bowl, place the flour and bicarb.
- In another bowl, cream together the butter, sugar and honey.
- Add the eggs in one at a time. If the mixture is too dry, add another egg.
- Stir the flour mix into the butter mix and combine.
- Add the mashed bananas, chopped nuts and chocolate, mix well.
- Pour into the tin and back for 1 hour. Skewer to test if it is cooked.
- Turn out and allow to cool.
- Slice and serve on its own, buttered or with some whipped cream.
Enjoy!
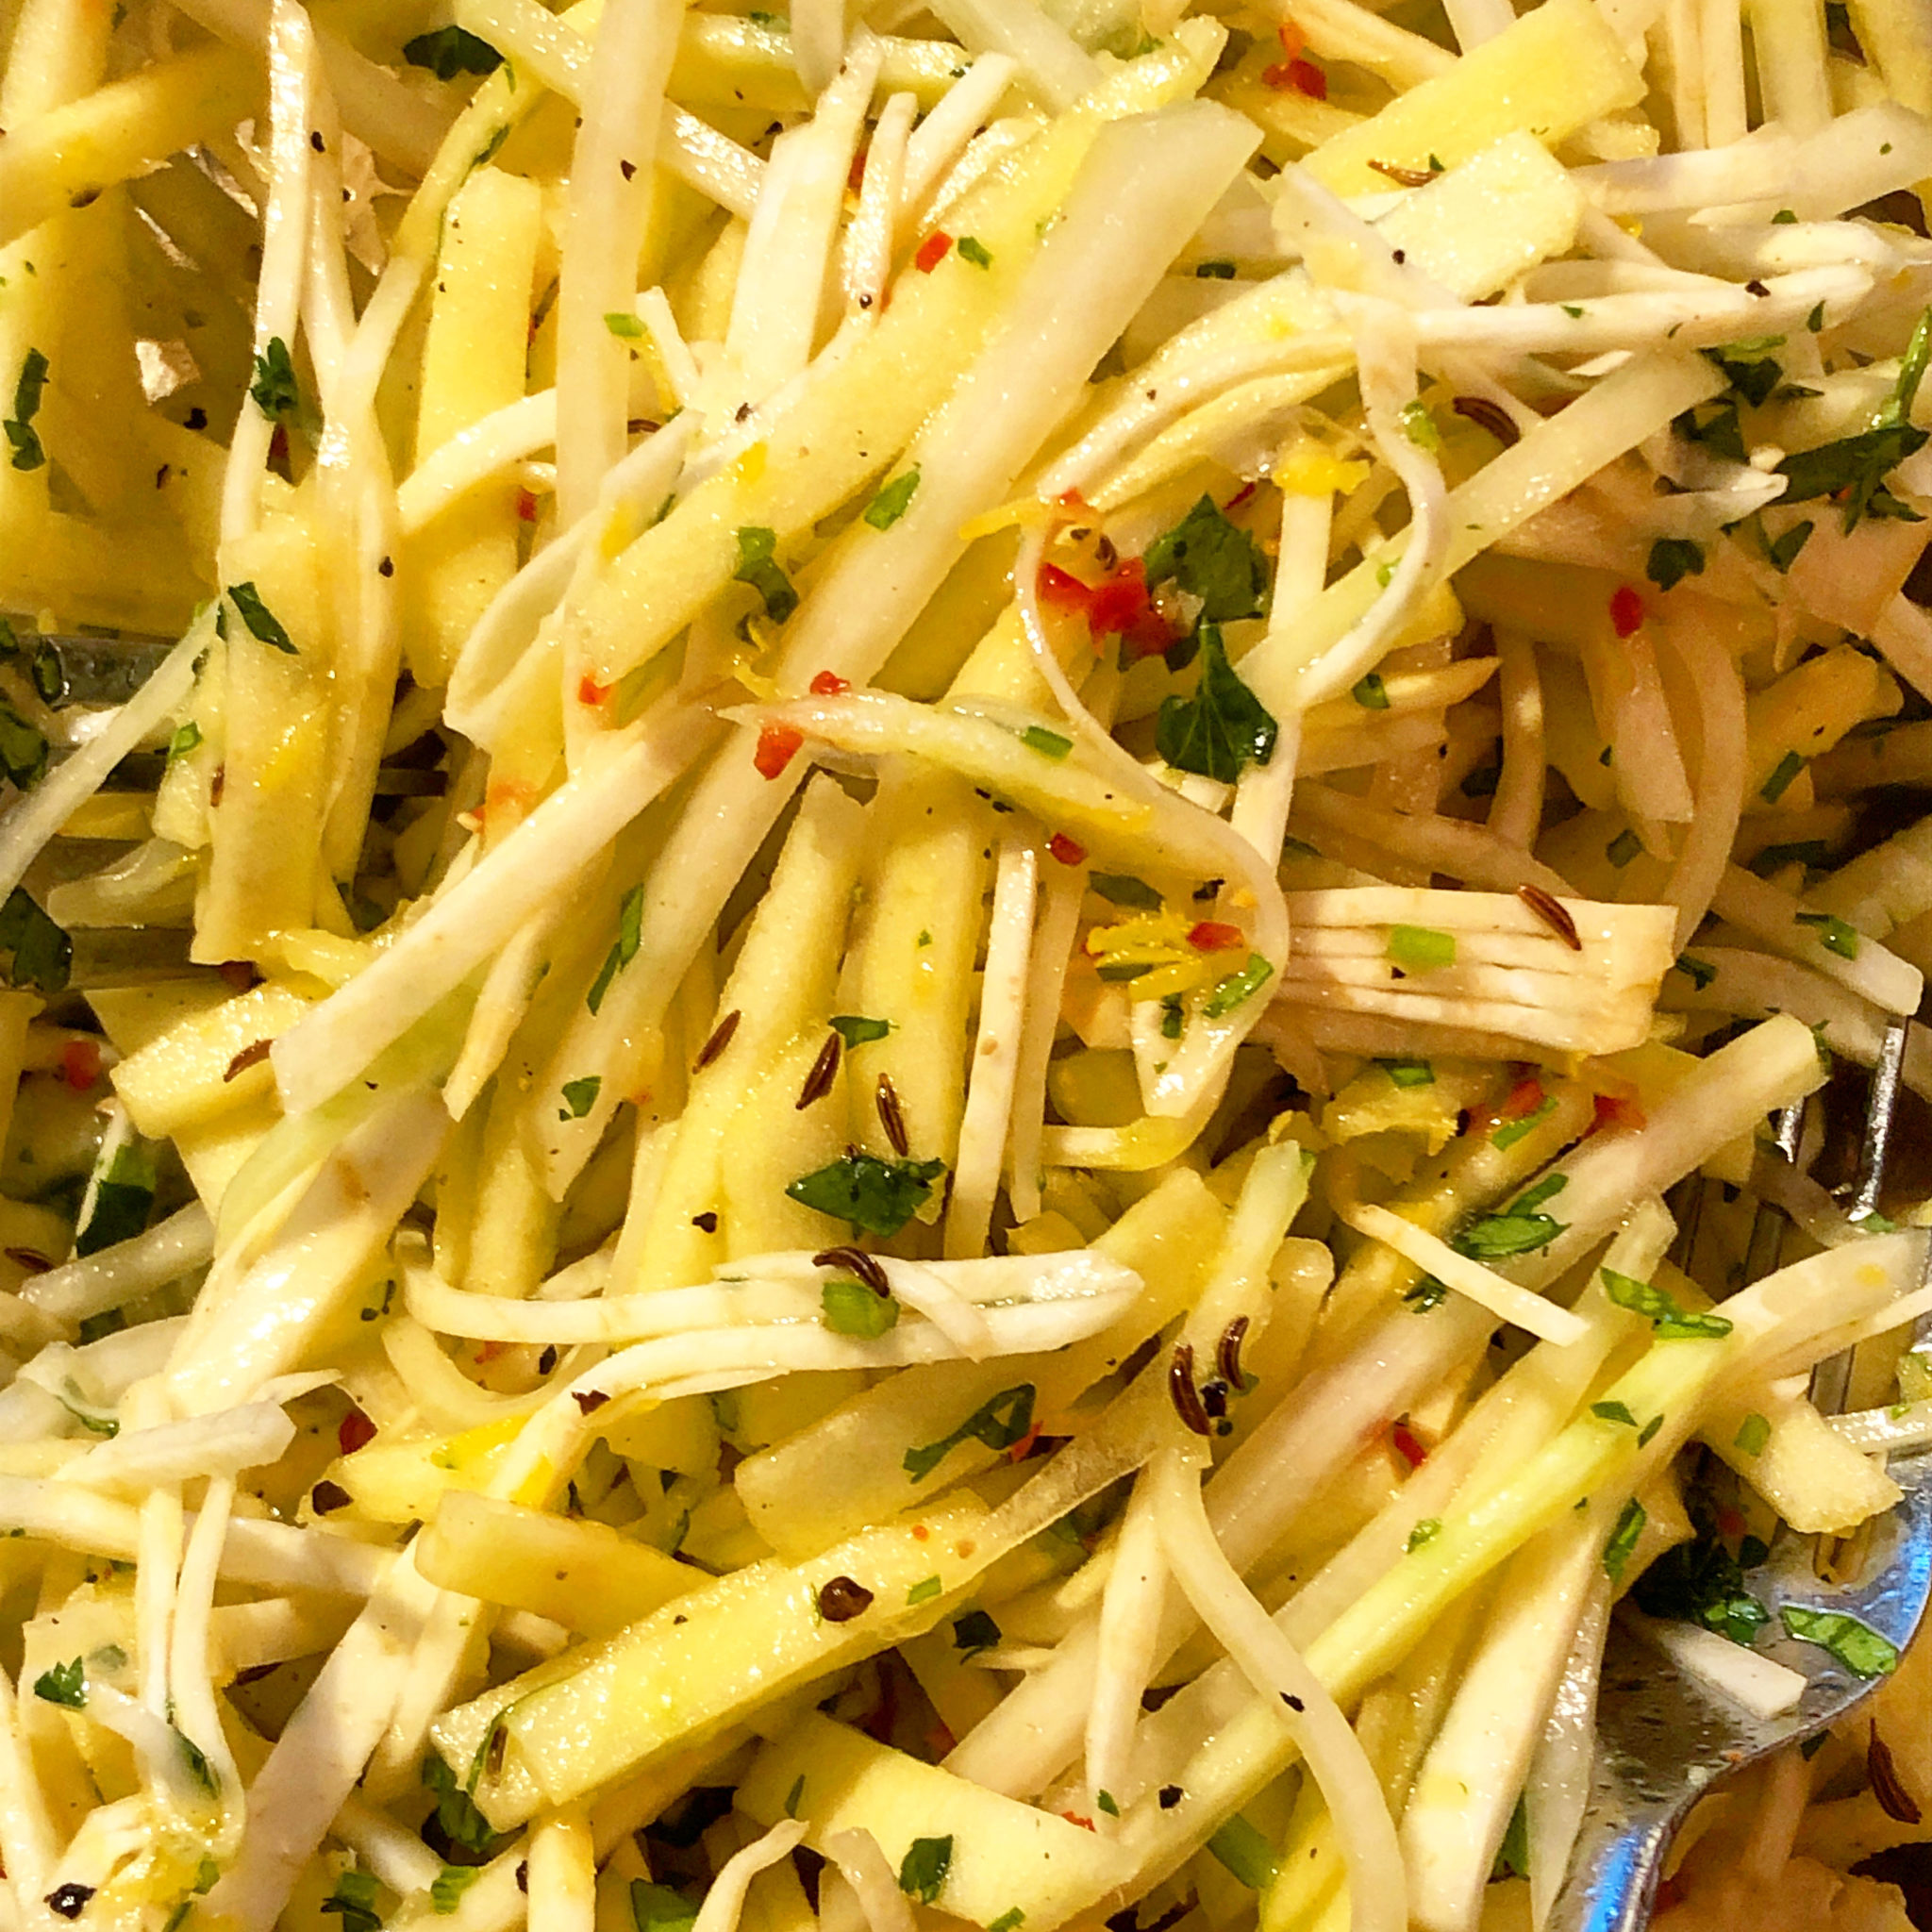
Celeriac, Kohlrabi & Apple Remoulade
Remo-what? I hear you cry… Well, a remoulade is a Danish chop salad or slaw, but takes its flavour notes from earthy, peppery tasting vegetables – usually celeriac. It is also usually creamy and speckled with wholegrain mustard, but in these times of making use of what you’ve got lying around and not travelling to shops unless necessary, this remoulade is much lighter using lemon juice and olive oil instead. It really lightens up the whole dish, and with warmer weather on the way, would be a perfect partner with BBQ meats, especially pork!
So, I guess strictly speaking this isn’t a remoulade, but it’s close enough!
I have used celeriac but also Kohlrabi – a bulbous vegetable that has a crisp, crunchy flavour somewhere between a Granny Smith apple and Mooli (that long white radish used in Asian dishes). It’s used a lot in Northern Continental Europe, as well as in Germany too. I added in apple too, as celeriac, kohlrabi and apple are great together!
There is a lot of chopping that goes into making this salad, admittedly, so you can decide what is the best way to get it done for you. At the moment, I have a little more time on my hands, so I like to do this all manually and just zone out for 20 minutes peeling and chopping. Or you could use a box grater, or the grater or julienne attachment on your food processor. Whatever works for you, it really doesn’t matter!
This makes quite a large bowl of salad, so will go with a couple of meals, depending on the number of people you are feeding! It will keep well enough for two days in the fridge in an airtight container, but no more than that.
Top Tip: If you wanted to make this creamy, then substitute the lemon and olive oil for either Creme Fraiche, natural yogurt or sour creme, add in a generous dollop of whole grain mustard and sprinkle all over with some chopped toasted hazelnuts.

Ingredients:
- 1/2 a celeriac bulb, peeled, sliced thinly and then julienned
- 1 Kohlrabi peeled, sliced thinly and julienned
- 1 large apple, peeled, cored, sliced thinly and (you guessed it), julienned
- 1/2 red chili, remove seeds and chop into tiny pieces
- 1/2 tbsp of caraway seeds
- 1 lemon, zest and juice of
- Handful of fresh coriander, roughly chopped small
- Extra Virgin Olive Oil
- Sea salt and pepper
Method
- Place all the ingredients in a bowl and mix to coat thoroughly.
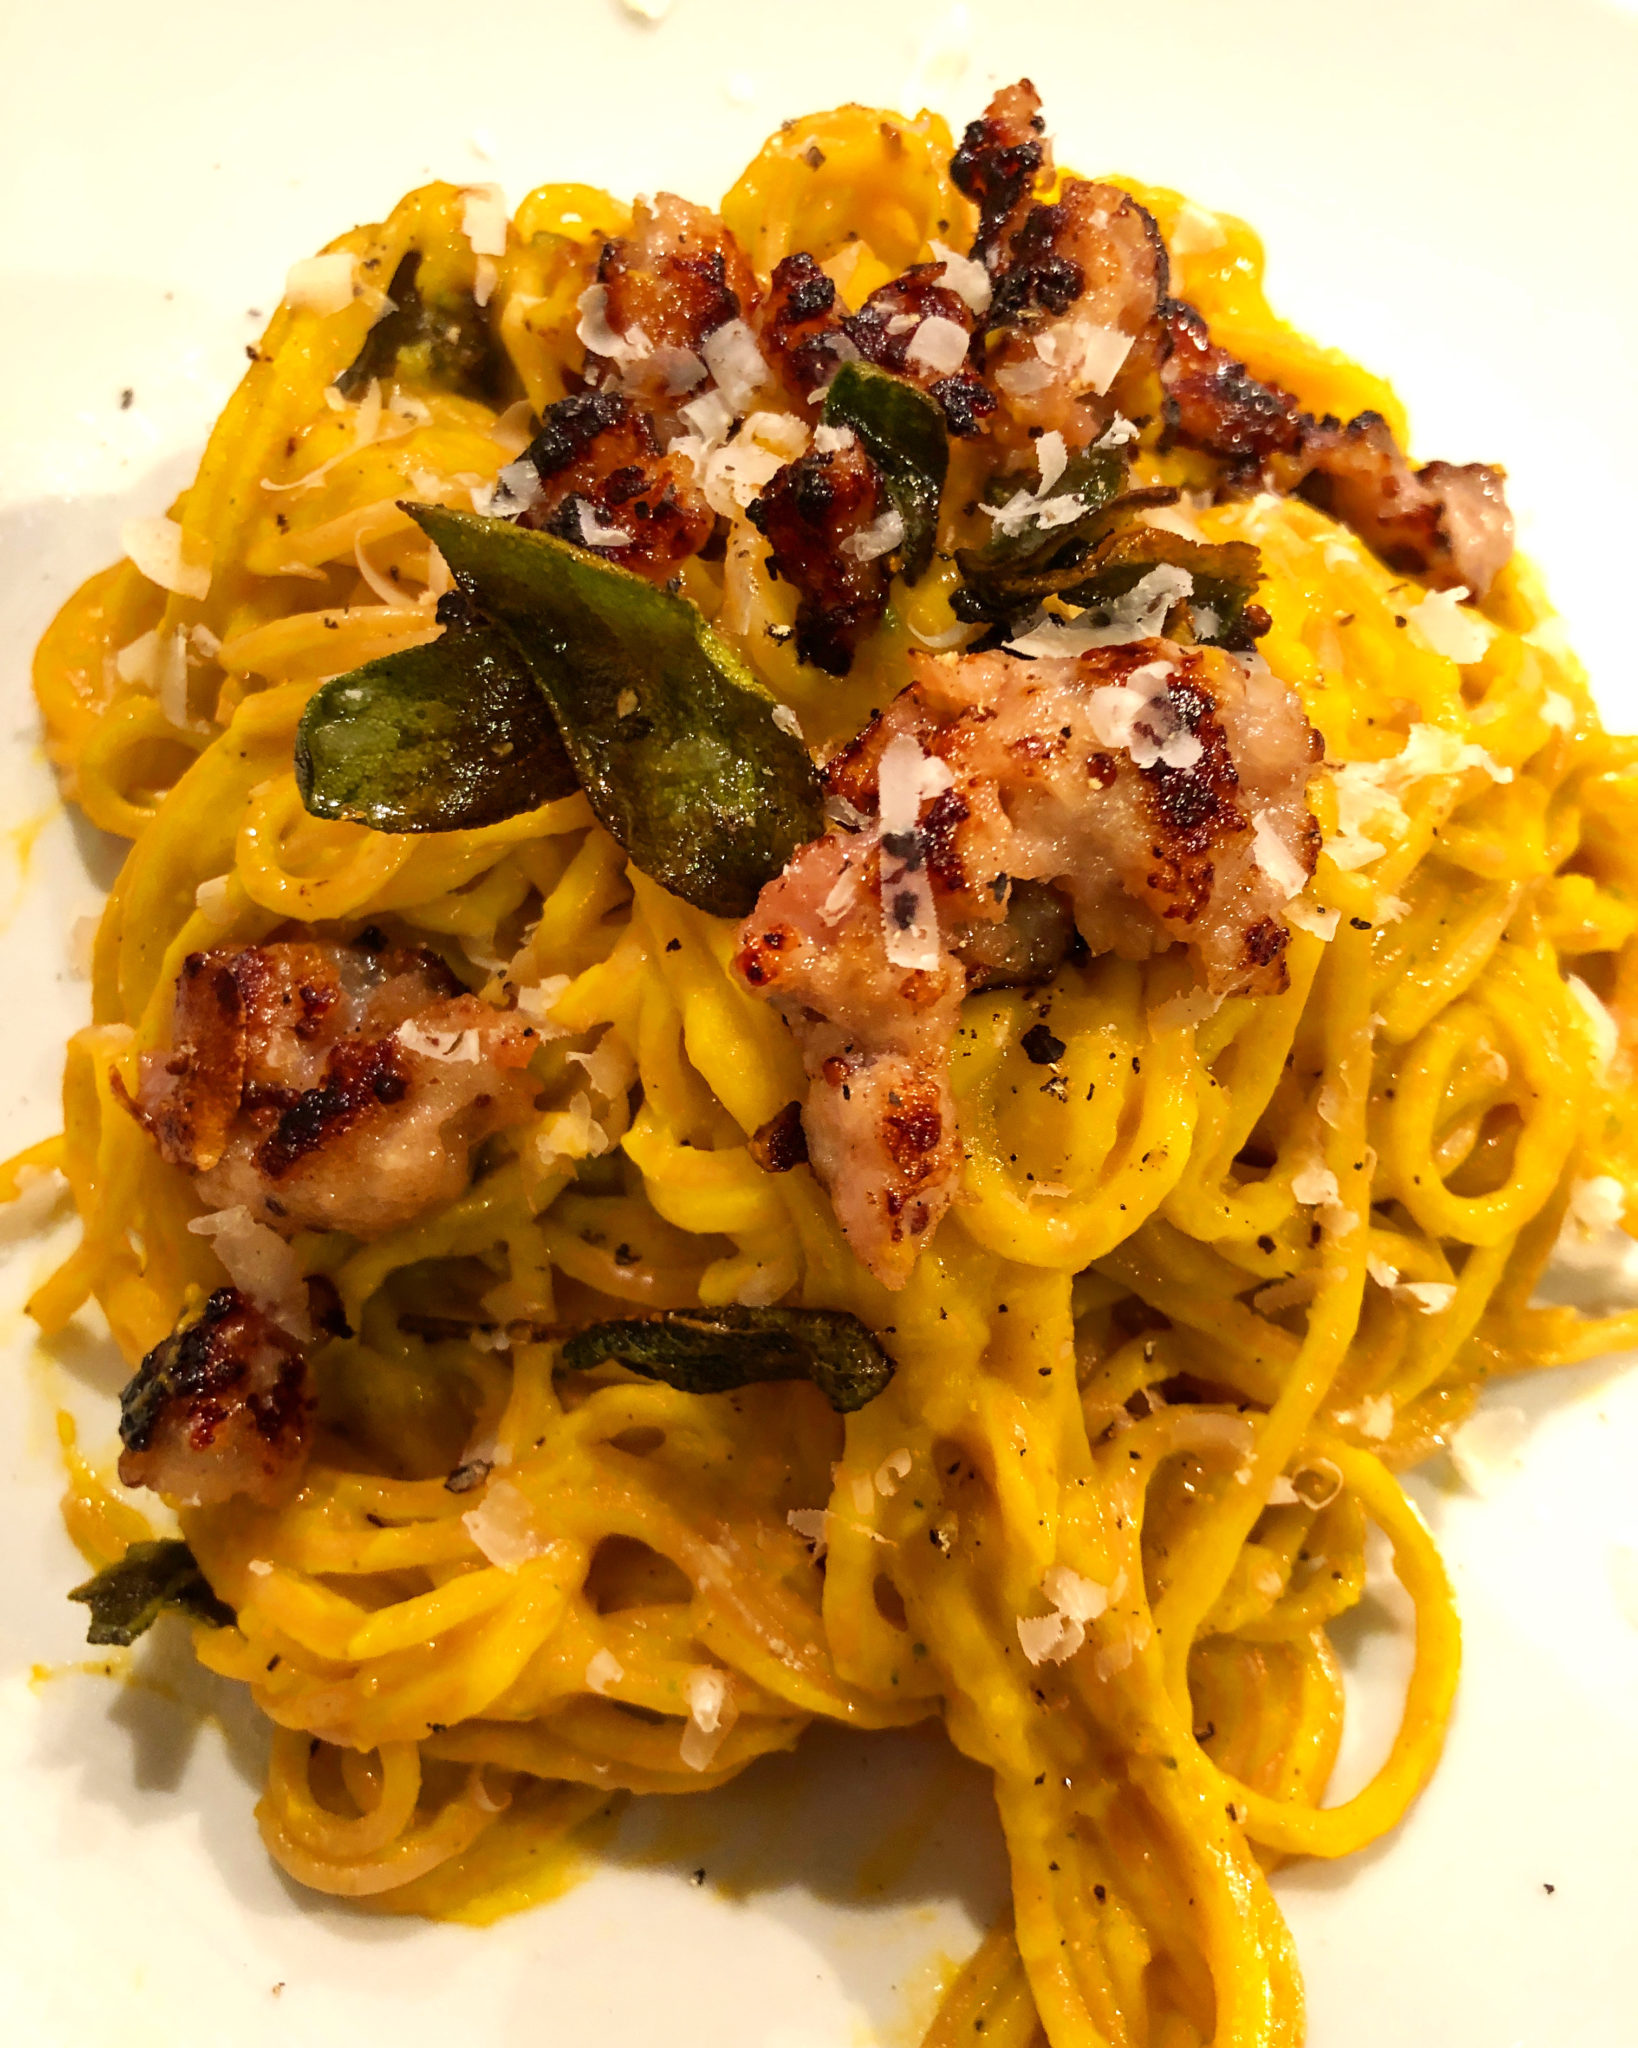
Squash, Sage & Pork Carbonara
Apparently, 6th April is World Carbonara Day, and I’ve just finished reading this wonderful article by Manuela Spinelli of Eurotoques Ireland on the heart pounding merits of a good classic carbonara, and also reminding us that the principle of Italian cuisine is “generally three ingredients that marry together and become a paradise of flavours.” I shudder to think what Manuela would say to me on spying the mushrooms I love to put in my carbonara, along with parsley and the wrong kind of pork and cheese.
But as much as my Carbonara a la Anglaise may be derided for tearing up the Italian cuisine rule book, I feel quietly confident that the recipe below for a very un-Carbonara-like-Carbonara would warm the cockles of your heart all the same. Just like the real Italian classic, it has three primary flavours, but that aside, this would probably have Italians the world over rolling their eyes at my incredulity and arrogance, while also unable to deny the glorious flavour triumvirate that is Squash, Sage and Pork.

In these times of Covid-19, when more than ever nothing should be going to waste in the kitchen, this recipe was born from the necessity to use up a couple of sausages and half a butternut squash. There is also sage, one of my favourite herbs for chilly days, a gentle hit of chili, garlic (because: well, garlic…!), and some lemon to freshen the whole thing up. It’s a surprisingly easy dish to make, but apologise to the evening’s pot-washer in advance as it definitely isn’t a one-pot wonder!
Top Tip! This dish will feed two people with plenty of left over sauce. This sauce can be thinned out a little the next day and heated up, drizzled with some chili oil and crème fraiche and served up with some thick crusty bread for a hearty soup for one the following day!
Ingredients:
- Half a butternut squash, peeled and chopped into medium chunks
- 2 pork sausages, skinned and ripped into small bite sized pieces
- 1 clove of garlic, peeled and sliced
- Red chili: either a few dried flakes or some fresh – to taste, background heat only!
- Handful of sage herb, leaves only
- 1 tbsp of fresh lemon juice
- 1 tsp of sea salt
- Freshly ground black pepper
- Long pasta: either spaghetti or linguine
- Olive Oil and Extra Virgin Olive Oil
- Parmesan Cheese
Method:
- Steam the butternut squash until tender.
- Place a large pot of well salted water onto boil. Just as the butternut squash is tender throughout, place the dried pasta into the boiling water.
- Meanwhile, in a frying pan cook down the sausage meat in a little olive oil until browned and glistening. Take out of the pan and place on kitchen paper.
- Reserve the meat cooking juices in the frying pan, and cook slowly the sliced garlic. Drain and place onto a piece of kitchen paper.
- Just before the pasta is cooked, place the tender butternut squash into a blender with the garlic, chili, lemon juice, sea salt, a generous twist of pepper, most of the sage and remaining meat juices from the frying pan. Add a little dash of water, (I use the water from steaming to retain the flavour), to help it along and blitz until completely smooth. Set aside.
- Drain the cooked pasta and place back into the saucepan. Dress the pasta with some Extra Virgin Olive Oil and set aside.
- Back to the frying pan and fry off the remaining sage leaves until crispy. Drain on kitchen paper.
- Pour the butternut squash sauce over the pasta a little at a time to coat it thoroughly and luxuriously. Don’t worry if there is a lot of sauce left over – you can have that for lunch tomorrow!
- Portion out onto warmed plates, top with nuggets of the browned sausage meat, crispy sage leaves, a final flourish with the pepper grinder and plenty of grated parmesan cheese.
Enjoy with a chilled, crisp white wine!
Sweet Golden Lassi

My love for Lassi knows no bounds. I’d sooner have a Lassi over a milkshake, and of course they can be sweet or salty but always delightful.
It is currently Mango season, so I’m getting beautiful mangoes in my organic veg box regularly. And just like pears, rarely do they arrive in perfectly ripe condition, so there is an element of waiting for the perfect moment of peak ripeness. Use up the mangoes we must do, and having them in a Lassi is one of my favourite ways to enjoy them!
We are blessed in West Cork to have Gloun Cross Dairy on our doorstep (more or less, West Cork is bigger than you might think!) I adore their milk, their cream and their Buttermilk too. It’s proper stuff, thick and full of goodness with just about the most perfect texture for Lassi making! Because its February, and because our immune systems are screaming for sunshine and warmth, (still a good few weeks away yet), I added organic, whole turmeric root here. It helps to boost the golden, sunshiny colour, but also is a great immune booster, good for the gut and to help ward anyway any nagging aches and pains with its anti-inflammatory properties. Despite its colour, it’s not sweet, but earthy in flavour, so a little goes a long way!

I added West Cork honey for some additional sweetness and goodness, and a little spritz of fresh lime juice just to enliven the natural acidity in the buttermilk to make the whole thing sing. Your blender does all the work for you, making this a perfect fuss free breakfast drink that sings of the warmer, sunnier days to come!
Time saving tip: keep ready to use frozen mango in your freezer, and simply add two handfuls to the blender!
Ingredients (makes 1 Lassi):
- 1 ripe mango, peeled and chopped;
- 2 cm piece of fresh turmeric root, peeled and grated (wash hands afterwards to prevent staining);
- 150ml of fresh Buttermilk;
- 2 tsp raw honey;
- Spritz of fresh lime juice;
Method:
- Place everything into a blender. Blend on high for 2 mins (or more if your blender is less powerful), ensuring everything has been well blended.
- Pour into a glass and consume with glee!
Enjoy…
Talking of mangoes… Dianne Jacob won the MFK Fisher award for her essay, The Meaning of Mangoes. Have a read of it HERE.
If you liked that, you might be interested to know that Dianne will be coming to West Cork in October this year to co-host a food writing workshop and food tour with yours truly called Food With a Story to Tell. Full event information and online booking can be found HERE …
Early Bird offer runs until 31st March 2020!